

Introduction
What is MISP?
MISP, short for Malware Information Sharing Platform, is an open-source threat intelligence platform. It is used to collect, store, share, and correlate Indicators of Compromise (IOCs) related to cyberattacks, malware, and financial fraud.
Essentially, MISP helps you:
- Gather IOCs: Import data like malicious IPs, domains, file hashes, etc.
- Organize Data: Structure IOCs into “Events” (incidents, campaigns).
- Find Connections: Automatically correlate related threat data.
- Share Intelligence: Distribute information to trusted partners or communities.
- Integrate: Export data for use in security tools (SIEMs, IDS, etc.)
This guide will explain you step by step how to set up your own MISP instance on a cloud server for enhanced threat intelligence.
Who is this guide for?
This guide is aimed at cybersecurity professionals, threat intelligence analysts, security students, researchers, and homelab enthusiasts who want to deploy a personal or small-team MISP instance. I’ll assume you have:
- Basic familiarity with the Linux command line.
- An understanding of how to connect to a server using SSH.
- Basic knowledge of domain names and DNS.
- Basic knowledge of nano editor (Linux)
Why Hetzner Cloud?
For this guide, I’ve chosen Hetzner Cloud due to its excellent balance of performance, reliability, and cost-effectiveness, making it a great option for hosting a personal MISP server without breaking the bank. The principles, however, can be adapted to other cloud providers.
Also with Hetzner you can get 15 euros coupon using the code - der8auer15. [For new users only, and it’s not mine so it may expire anytime.]
What will be covered:
This guide is structured to take you from a bare cloud server to a fully operational MISP instance. We’ll break it down into manageable phases:
- Server Provisioning: Getting your virtual server up and running on Hetzner Cloud.
- Initial Server Setup: Securing basic access and preparing the operating system.
- Installing Core System Dependencies: Laying the groundwork with essential software like Apache, MariaDB, PHP, and Redis.
- Database Setup: Configuring MariaDB specifically for MISP.
- Installing the MISP Application and Core MISP Configuration: Getting the MISP codebase onto your server and setting up MISP’s fundamental configuration files.
- Web Server Configuration: Telling Apache how to serve your MISP instance.
- Finalizing MISP & First Login: The last steps before you can log in.
- Securing with HTTPS: Adding that crucial padlock to your MISP’s web address.
- Essential Post-Installation: Making MISP fully functional with background workers and scheduled tasks.
- Enabling Feeds: Populating your MISP with valuable threat intelligence.
Prerequisites
Before we begin, please ensure you have the following ready:
- Hetzner Cloud account. If you don’t have one, you can sign up and make a new account at www.hetzner.com.
- SSH key pair (public and private key). You’ll need the public key to add to Hetzner for secure server access. - If you have problems in doing this, please check out - https://www.digitalocean.com/community/tutorials/how-to-configure-ssh-key-based-authentication-on-a-linux-server
- Registered domain name (e.g., yourdomain.com). While you can access MISP via IP initially, a domain name is required for setting up HTTPS with a trusted SSL certificate.
Ready to dive in? Let’s get started!
Phase 1: Setting up your Hetzner Cloud Server
Alright, let’s get into setting up the server that will host our MISP instance! We’ll be using Hetzner Cloud for this. If you haven’t already, make sure you’ve signed up for a Hetzner Cloud account (Free code in here).
1.1 Choosing the Right Server Plan
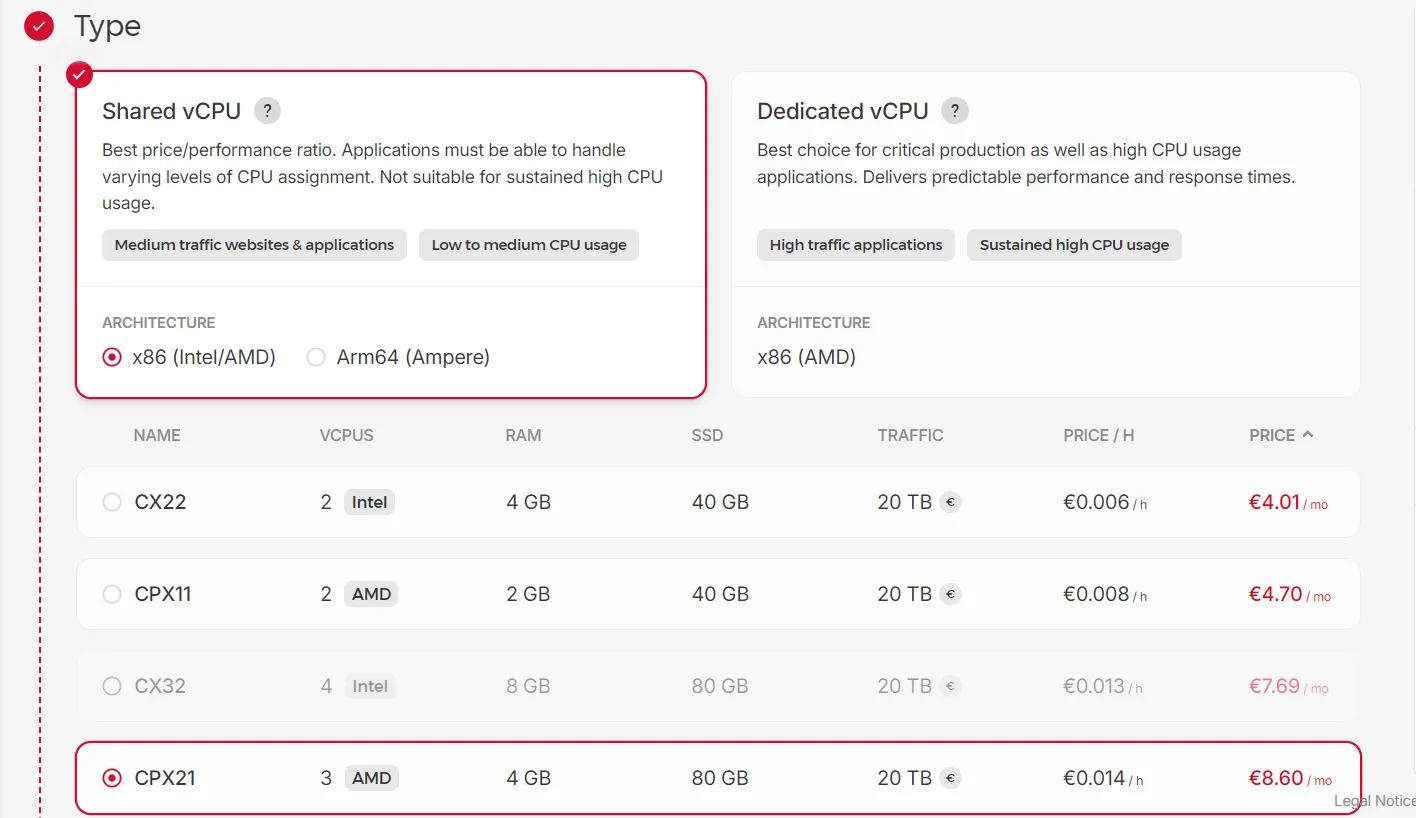
Hetzner offers various server plans. For a personal or small-team MISP instance that will handle feed ingestion and some analysis without issues, the CX32 plan is a fantastic sweet spot. It offers:
- 4 vCPUs: Good processing power for MISP’s tasks.
- 8 GB RAM: Crucial for the database (MariaDB) and MISP’s background workers.
- 80 GB NVMe SSD: Fast storage, providing enough space for the OS, MISP, and a growing database of indicators.
- Affordable Price: It delivers excellent value for its performance.
While smaller plans exist, the 8GB RAM in the CX32 makes a noticeable difference for MISP’s stability and responsiveness, especially during those initial, heavy feed imports. Alongside MISP, I am running Joplin and ActualBudget Docker container servers on my CX32 machine, so in case you just want to to run MISP and are not able to find CX32 machine available, you can also use alternative machines like:
- CX22
- CPX11
- CPX12

These are similar or cheaper alternatives to CX32 that will satisfy the MISP server requirements. Please select one machine that you would like to go one with and proceed forward…
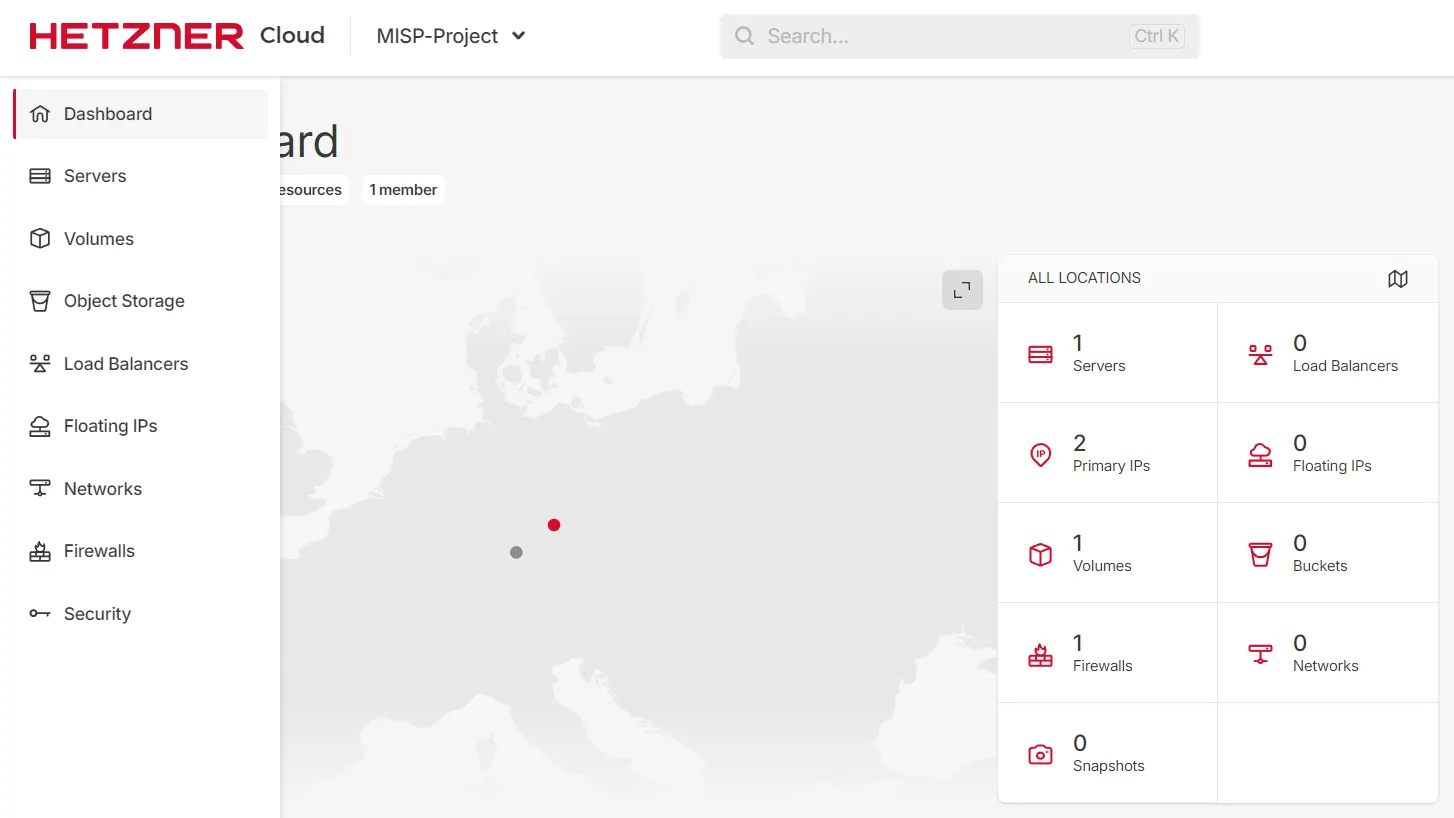
1.2 Creating a Project
Organizing your cloud resources is always a good idea. Let’s create a project in Hetzner Cloud to house our MISP server:
- Log in to your Hetzner Cloud Console: https://console.hetzner.cloud
- On the main dashboard or by clicking your profile icon (top right), find and click on “Projects”.
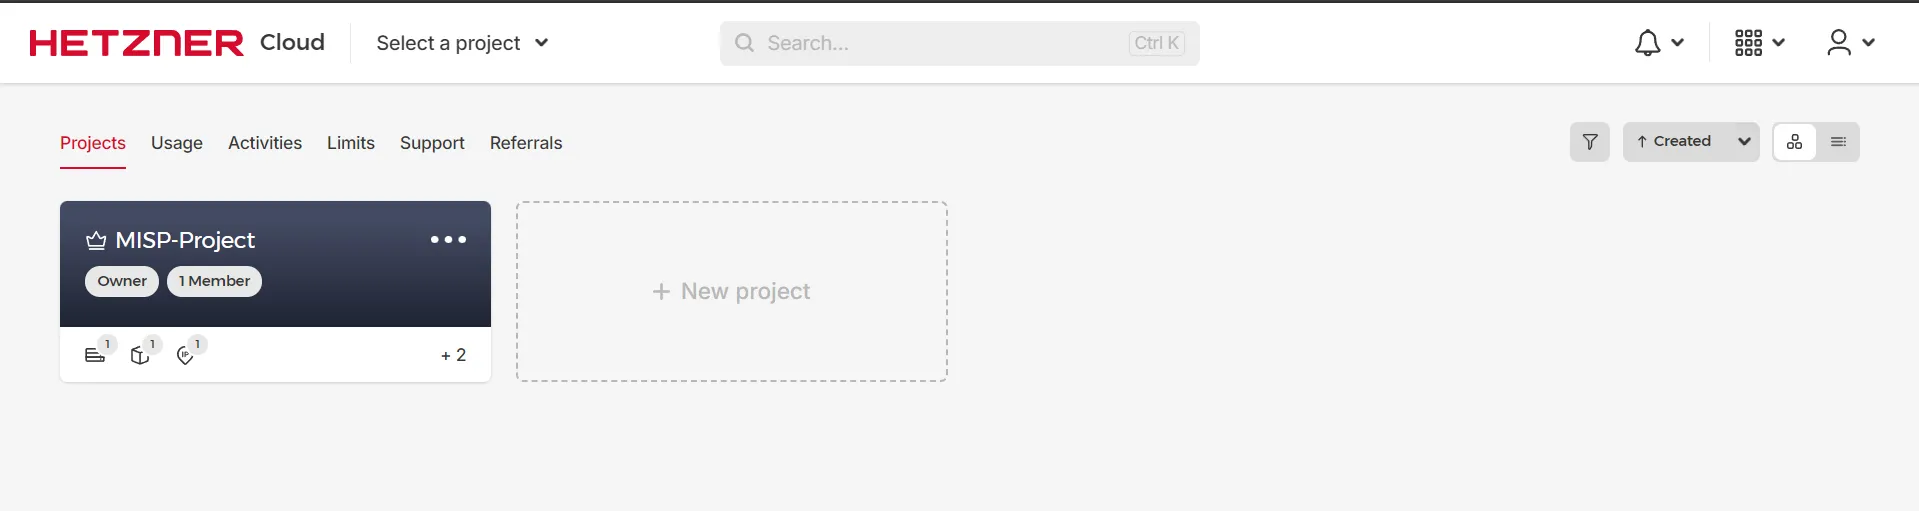
- Click ”+ Add project”.
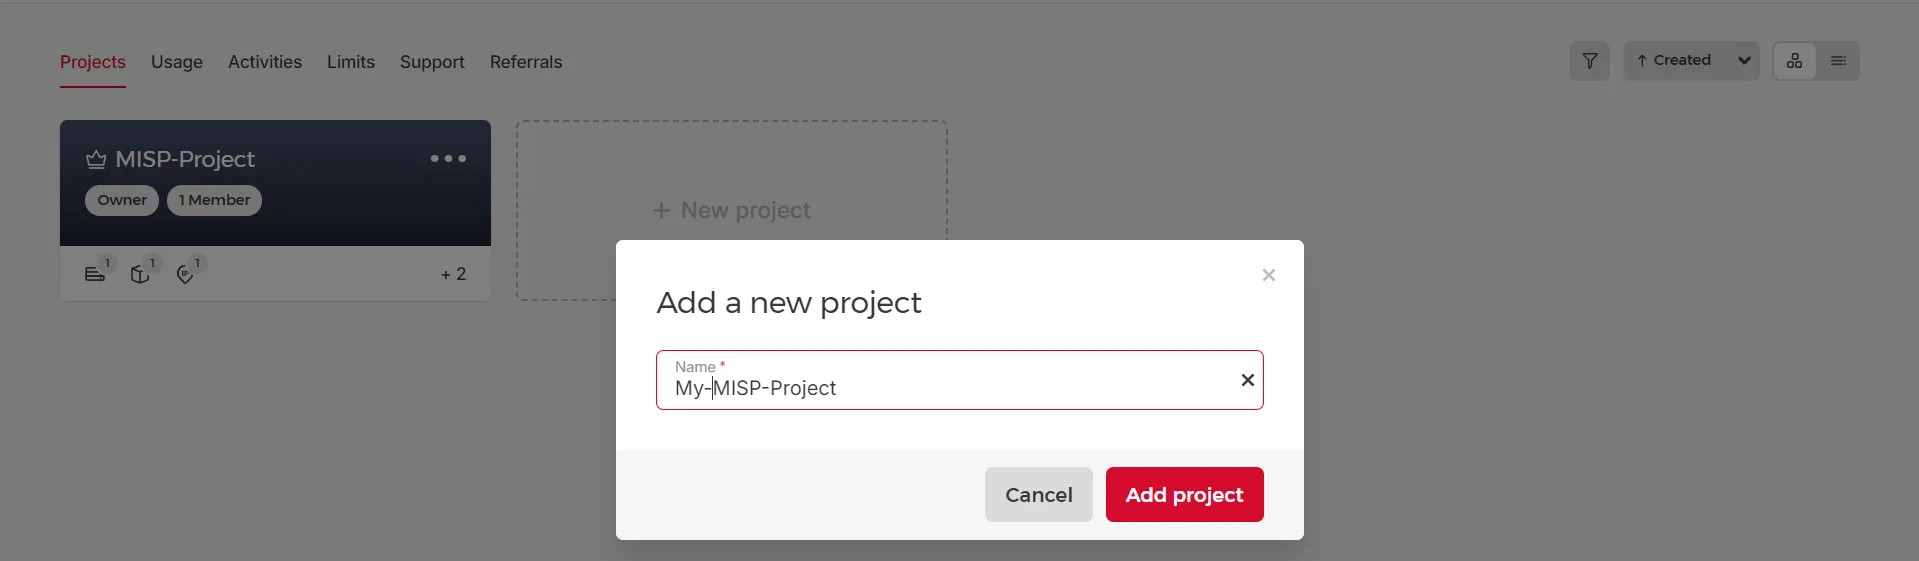
- Give your project a descriptive name, like MISP-Instance-Blog or MyMISPServer.
- Click “Create project”.
- Once created, click on your new project name to select it. All resources we create now will be associated with this project.
1.3 Adding your SSH Key to Hetzner
We’ll be using SSH key-based authentication to log into our server. It’s far more secure than using passwords. You should have your SSH public key ready (from the prerequisites).
- In the Hetzner Cloud console, within your selected project, look for the Security section in the left-hand sidebar menu (it usually has a key or shield icon). Click it.
- Select “SSH Keys”.
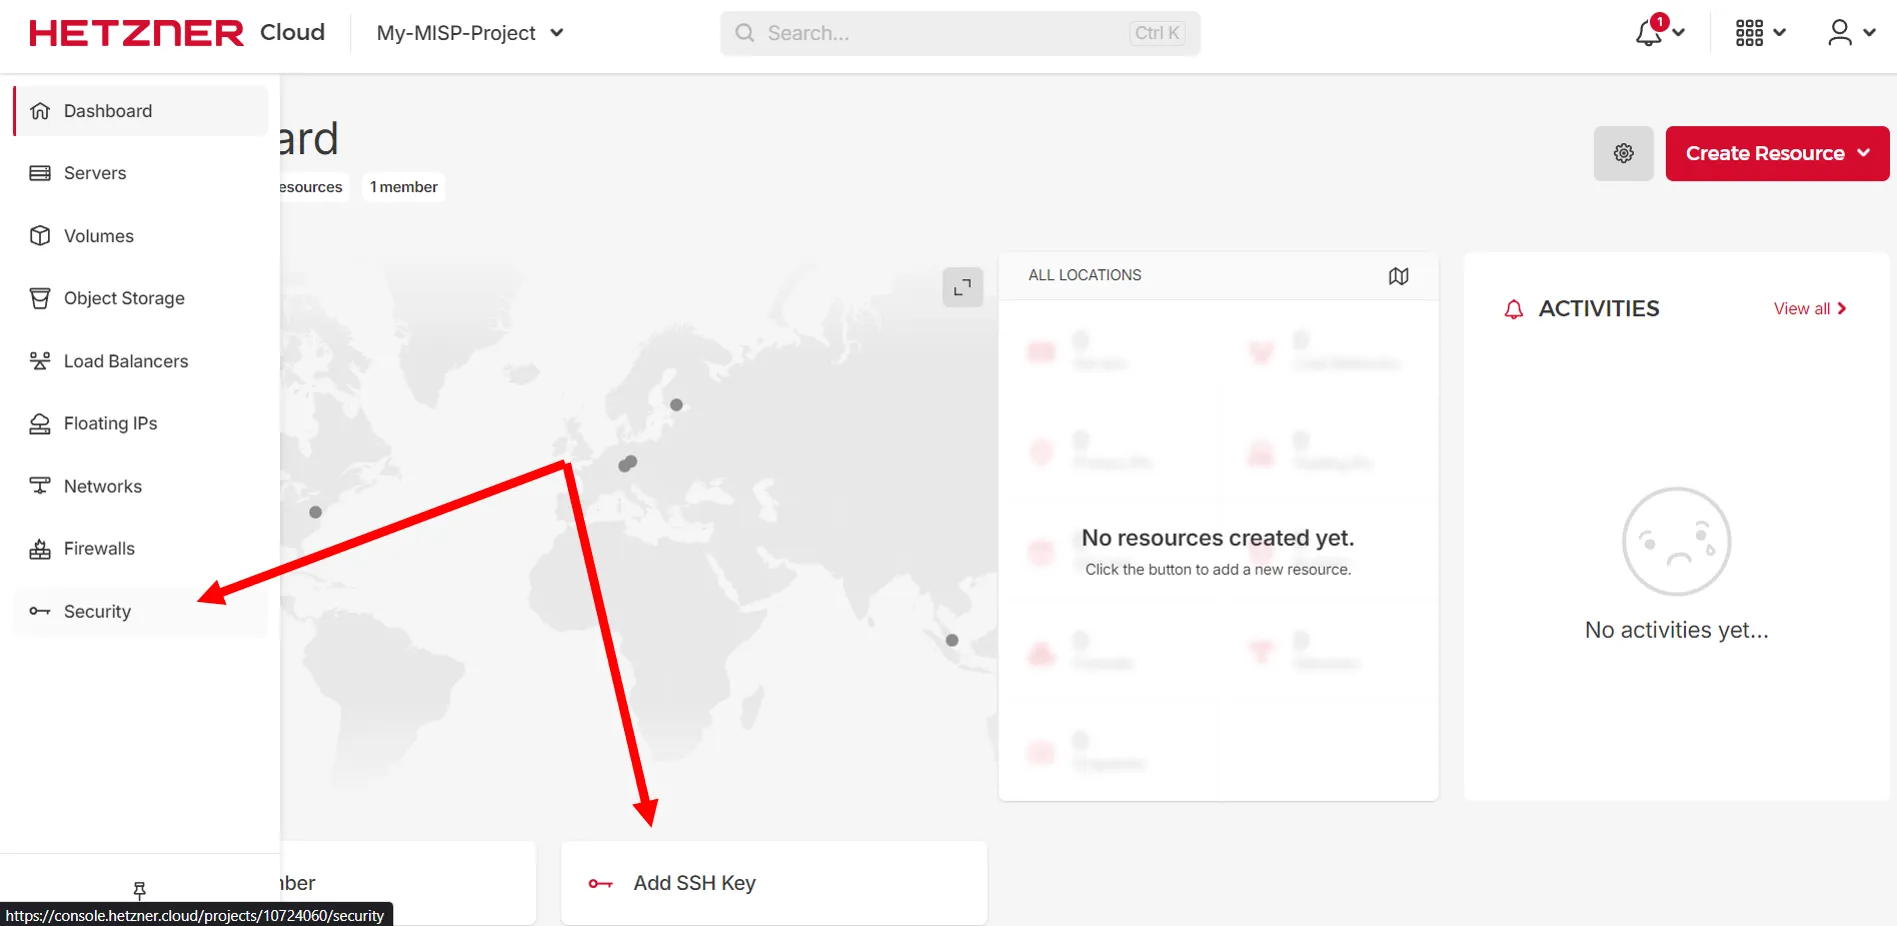
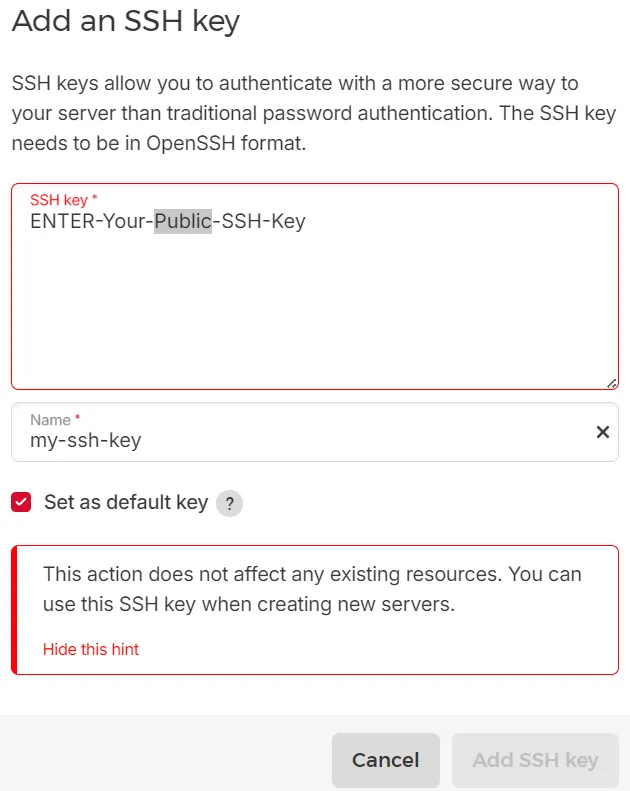
- Click ”+ Add SSH key”.
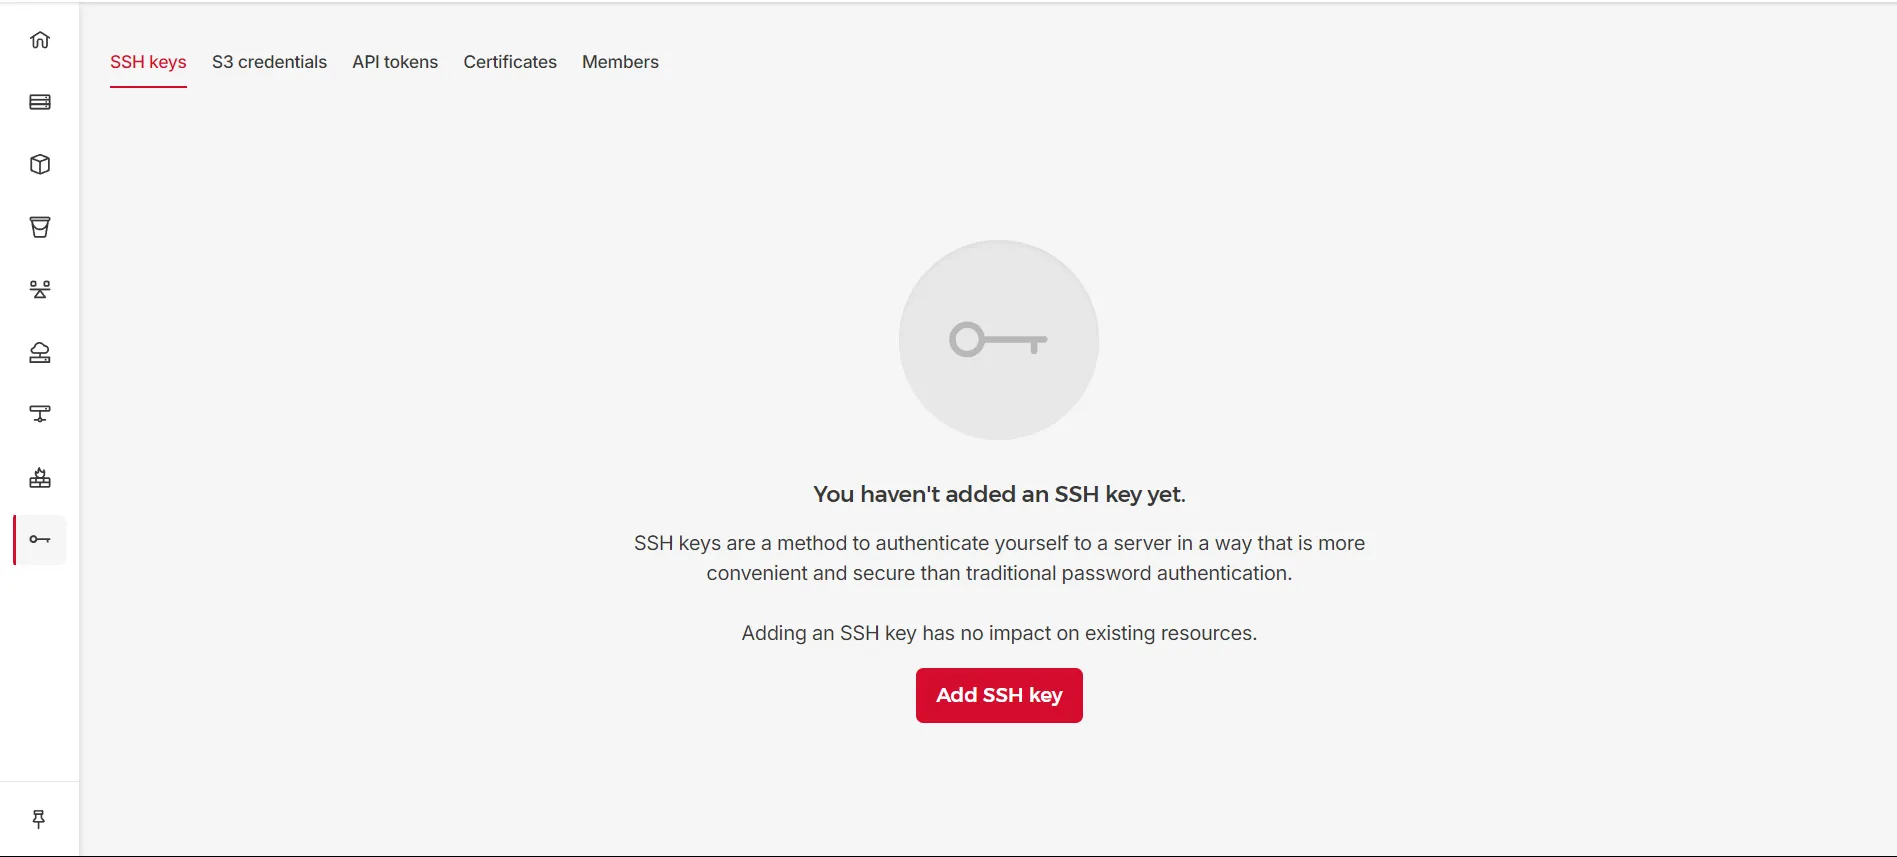
- Name: Give your key a recognizable name (e.g., MyLaptopKey, WorkstationKey).
- Public Key: Paste the entire content of your public SSH key (the one usually ending in .pub, like ~/.ssh/id_ed25519.pub) into the text box.
- Click “Add SSH key”.
1.4 Creating the Server Instance
Now for the main event – creating the virtual server!
In your project, click on “Servers” in the left sidebar.
Click ”+ Add server”.
Configure the server options:
Location: Choose a server location. Falkenstein (FSN1) or Nuremberg (NBG1) in Germany are popular choices, but pick what’s best for you.
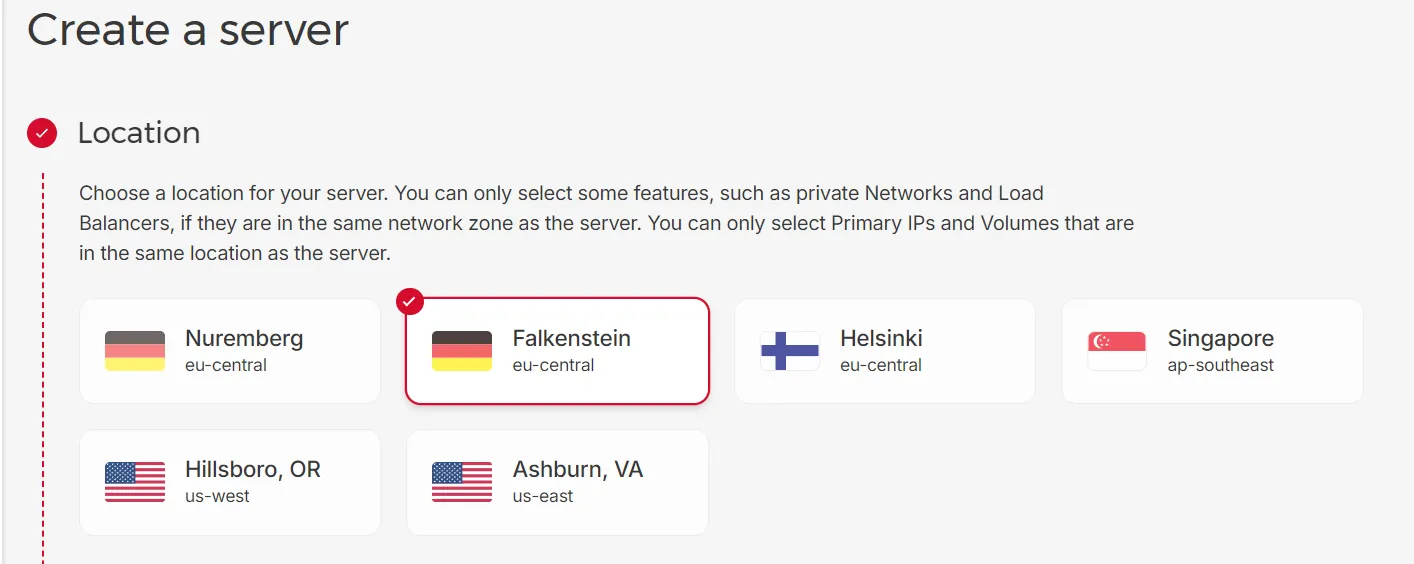
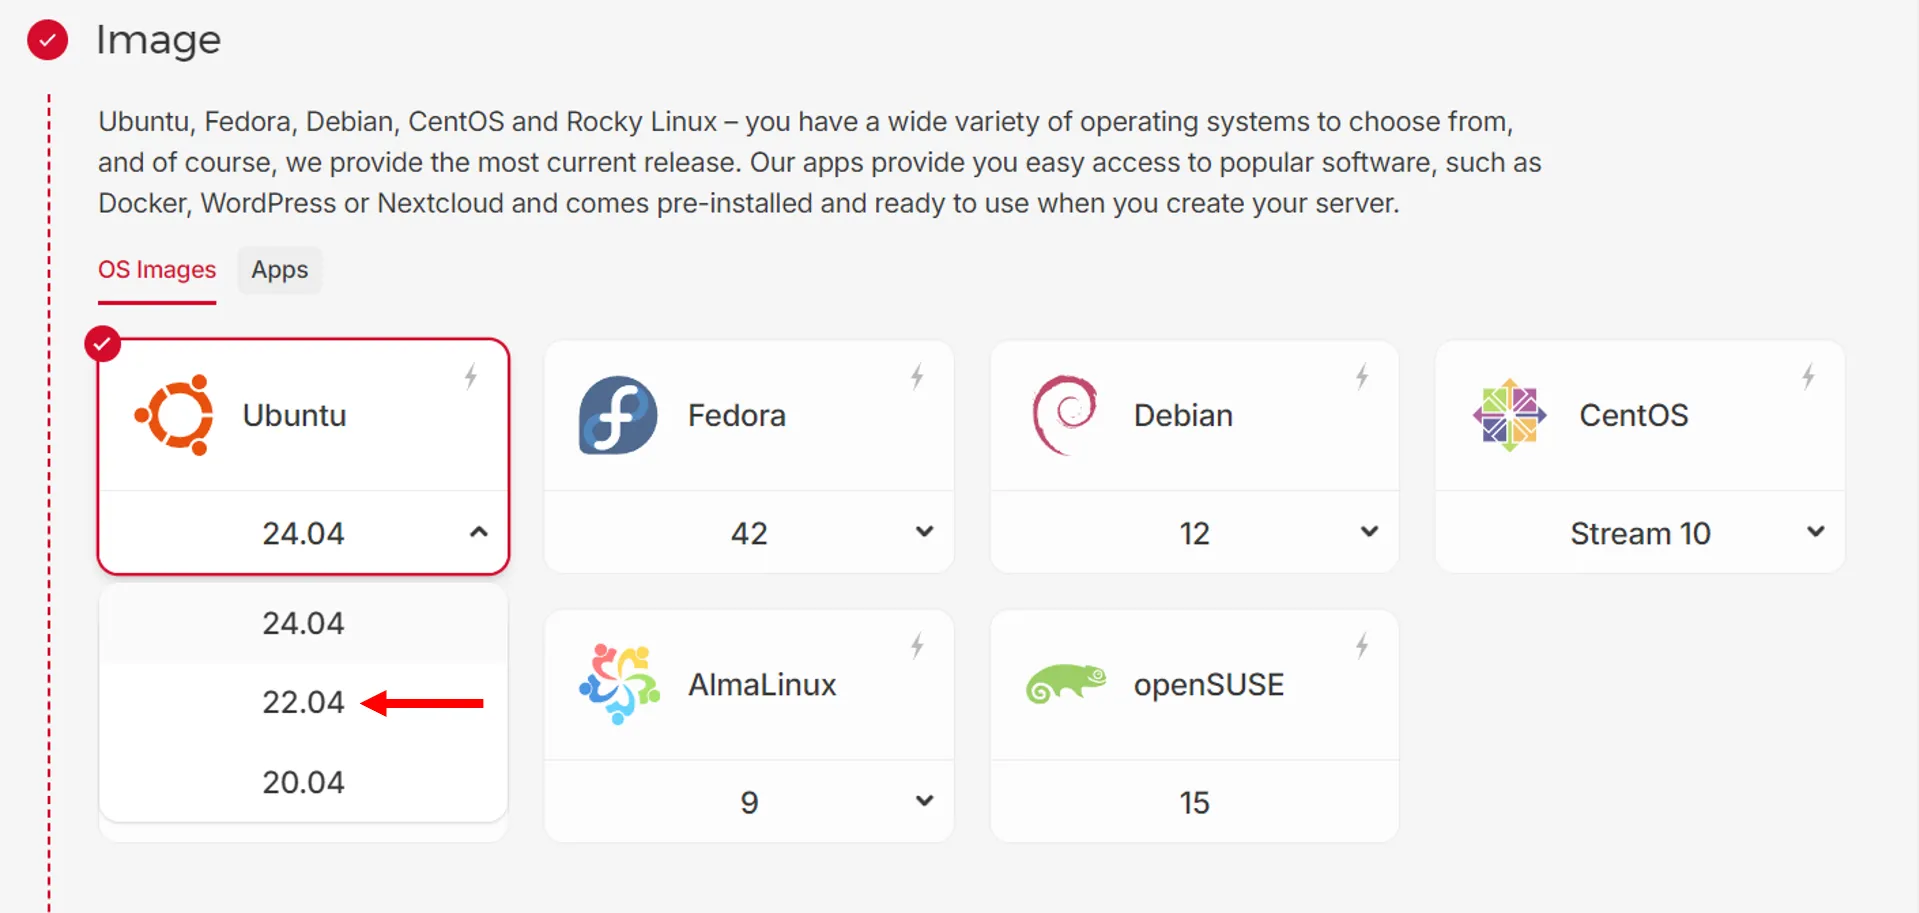
Image: Select the “OS Image” tab. Choose Ubuntu 22.04.
Type: Select the “Standard” tab. Choose the CX32 plan or whatever suits you the best.
Volume: You can skip adding an extra volume for now; the 80GB primary disk is sufficient.
Networking:
- Ensure “Public IPv4” is enabled (it usually is by default).
- You can enable “Public IPv6” if you plan to use it. (It’s mostly free for a single IP)

SSH Key: This is crucial! In the “SSH Key” dropdown, select the SSH key you just added (e.g., MyLaptopKey). This ensures you can log in securely without a password.
Firewall: We’ll create one now. Click “Create Firewall”:
- Name: Give it a name like MISP-Firewall.
- Inbound rules: Click ”+ Add rule” for each of the following:
- Rule 1 (SSH):
- Protocol: TCP
- Port: 22
- Source: Select “Any IPv4” and “Any IPv6” for now. (For better security, you can restrict this to your specific IP address if it’s static, but “Any” is fine to get started).
- Rule 2 (HTTP):
- Protocol: TCP
- Port: 80
- Source: “Any IPv4” and “Any IPv6”
- Rule 3 (HTTPS):
- Protocol: TCP
- Port: 443
- Source: “Any IPv4” and “Any IPv6”.
- Rule 1 (SSH):
- Click “Create Firewall”.
- Back on the server creation page, under the “Firewall” section, select the
MISP-Firewallyou just created from the dropdown. Once done it should look like this: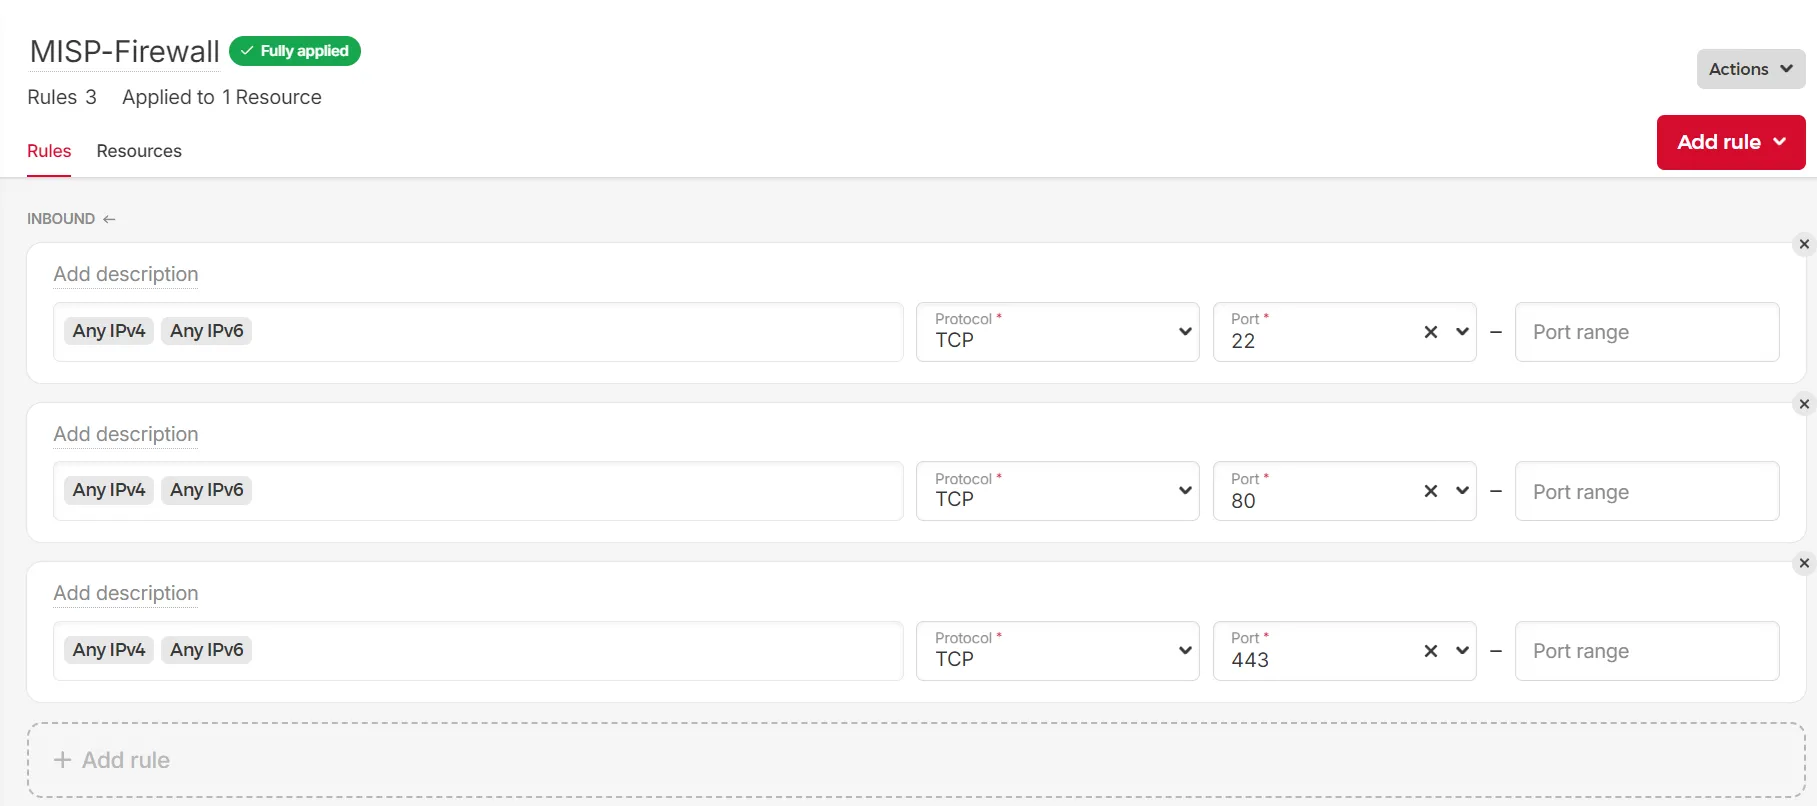
Backups: Optional. Enable if you want Hetzner to manage backups (this incurs an additional cost).
Placement Groups**: Skip for now.
User data: Skip for now.
Name: Give your server a descriptive name, like
misp-server-guideormy-misp-instance.
Review and Create: Double-check all your selections, especially the Image (Ubuntu 22.04), Type (CX32), SSH Key, and Firewall.
Click “Create & Buy Now”.
If everything is done properly you should see something similar in your dashboard as shown in the image below.
1.5 Noting Your Server’s IP Address
Once the server is provisioned (it usually takes just a minute or two), Hetzner will display its details, including its Public IPv4 address. 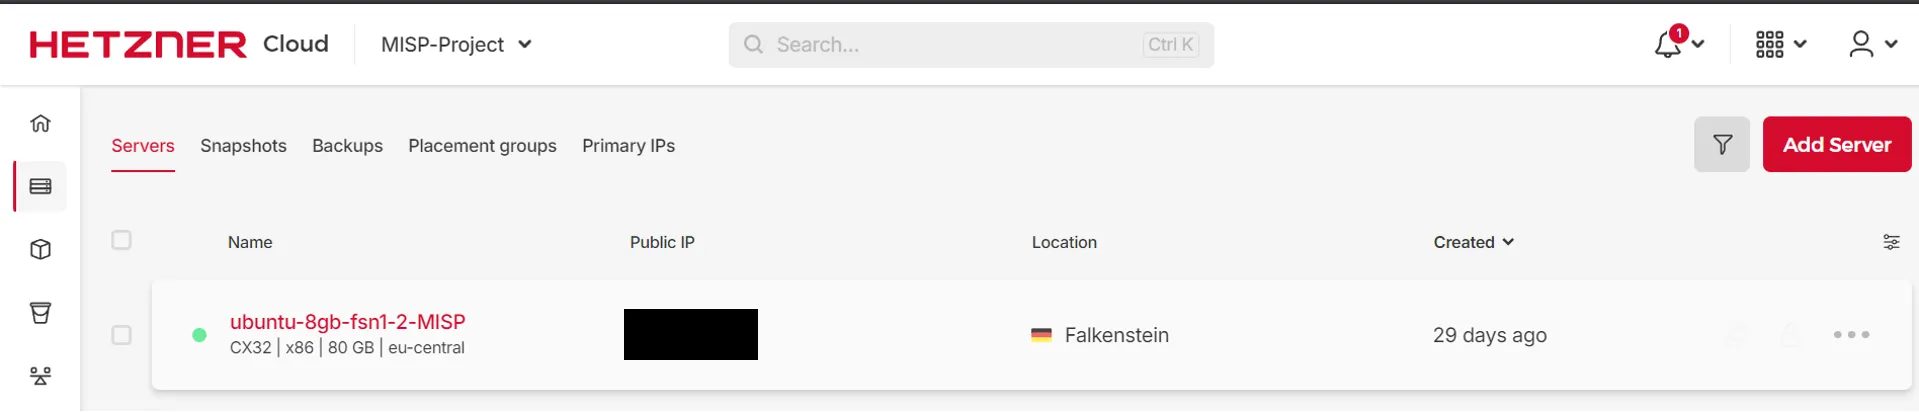
- Action: Copy this IP address and save it somewhere safe. You’ll need it for the next steps to connect to your server. Let’s refer to this as
YOUR_SERVER_IPthroughout the rest of the guide.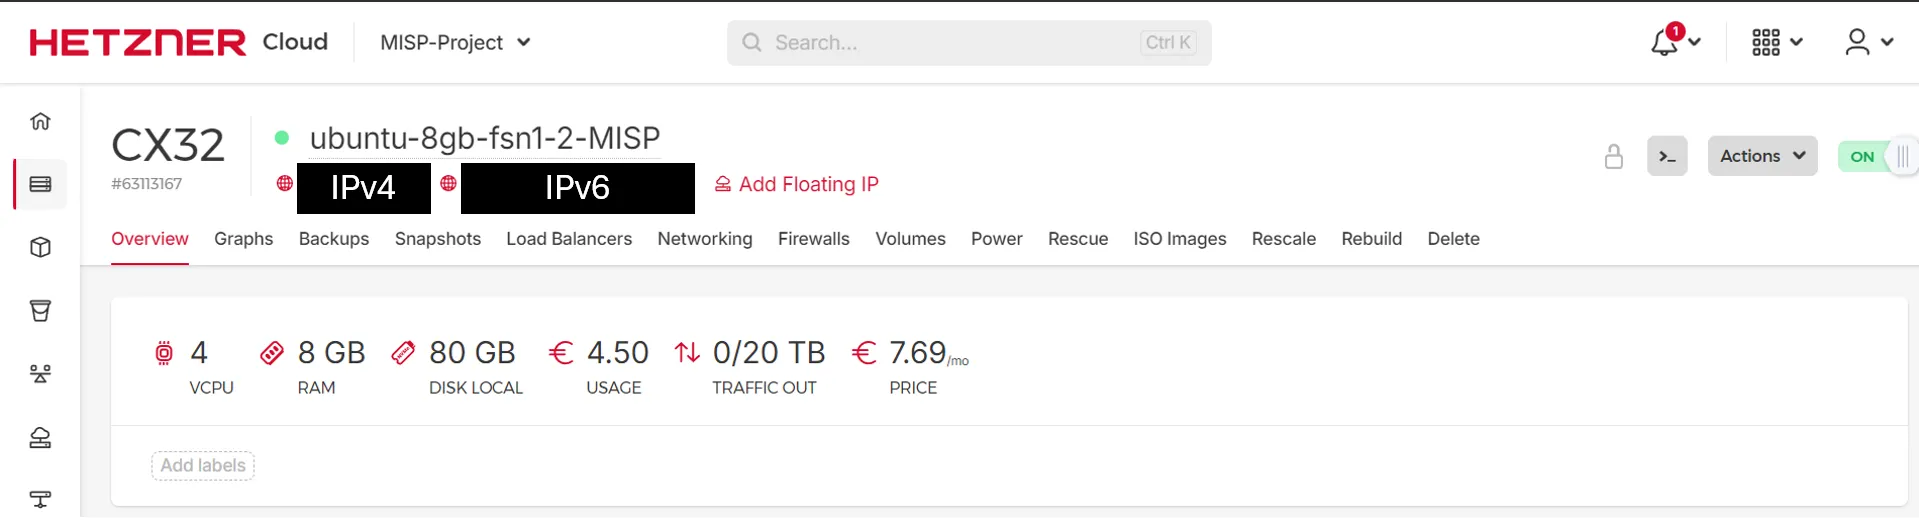
And that’s Phase 1 complete! You now have a fresh Ubuntu server ready and waiting in the cloud. In the next phase, we’ll log in and do some initial security hardening.
Phase 2: Initial Server Access & Security Hardening
With our Hetzner Cloud server up and running, it’s time to log in for the first time and perform some essential security hardening steps. This will create a more secure environment before we start installing MISP.
2.1 Connecting via SSH (as root initially)
When your server was created, Hetzner configured it to allow login using the SSH key you selected. The default user for this initial login is root. For this you either will need access to a LinuX machine. If you don’t have a linux machine running, you can also go to the Hetzner website and request the server Console. 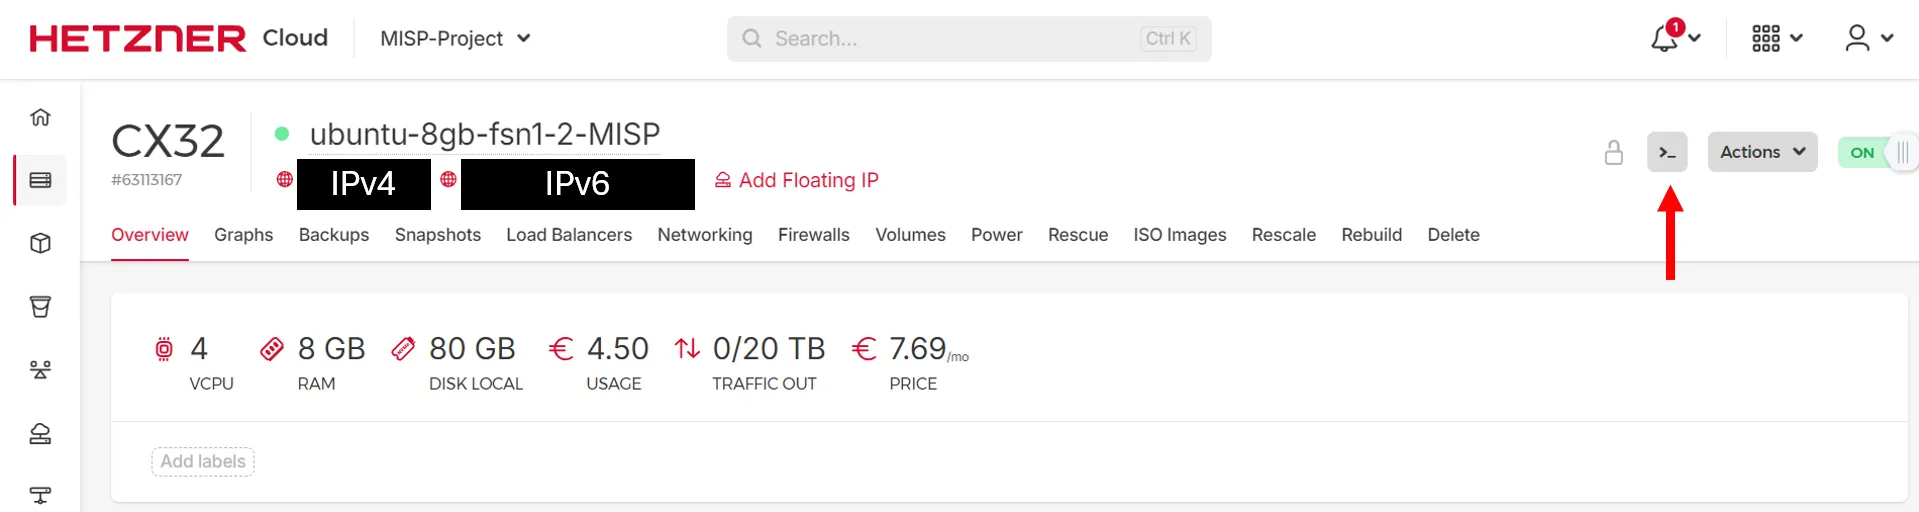 This will open a browser based terminal that you can use to access your Hetzner cloud server. Once you are ready - proceed with the following:
Open your terminal (on Linux/macOS) or an SSH client like PuTTY (on Windows) or through the Hetzner cloud console.
Use the following command, replacing
YOUR_SERVER_IPwith the IP address you noted down and /path/to/your/private_key with the actual path to your private SSH key file (e.g.,~/.ssh/id_ed25519or~/.ssh/id_rsa):ssh -i /path/to/your/private_key root@YOUR_SERVER_IP- Example:` ssh -i ~/.ssh/id_ed25519 [email protected]
The first time you connect, you’ll likely see a message about the authenticity of the host and its ECDSA key fingerprint. Type yes and press Enter to continue connecting.
You should now be logged into your server as the root user. The prompt will look something like root@your-server-name:~#
2.2 System Updates
The first thing we should always do on a new server is update the package lists and upgrade any installed packages to their latest versions. This ensures we have the latest security patches and software updates.
apt update
apt upgrade -y
apt update: Refreshes the list of available packages from the repositories.apt upgrade -y: Upgrades all currently installed packages to their newest versions without prompting for confirmation (that’s what the-ydoes).
This might take a few minutes depending on how many updates are available.
2.3 Creating a Non-Root Sudo User
Logging in and operating as the root user all the time is risky. If you make a mistake as root, you can easily break your system. It’s much safer to create a regular user account and grant it sudo (superuser do) privileges. This means that your user can perform administrative tasks by prefixing commands with sudo and entering their own password. So you will need to enter your root password every time you use the sudo command.
Let’s create a user. We’ll use misp as an example, but feel free to choose whatever username you prefer. The MISP documentation uses misp and expected a user named misp to be available for using the official installation scripts. So unless you prefer to edit the official install scripts directly, I’d recommend to use misp as the username.
- Create the new user:
adduser misp- You’ll be prompted to set a new password for this user. Choose a strong, unique password and enter it twice.
- You’ll then be asked for some optional user information (Full Name, Room Number, etc.). You can press Enter to skip through these if you like. Confirm the information is correct by typing
Yand pressing Enter.
2.4 Setting Up SSH Key Login for the New User
We want to be able to log in as our new misp user directly with our SSH key, just like we did for root.
Grant
sudoprivileges to your new user:usermod -aG sudo mispusermod: Modifies a user account.-aG sudo: Appends (-a) the user to the supplementary group (-G) namedsudo.
Copy the
rootuser’s authorized SSH keys to the new user’s home directory. This effectively allows your SSH key to also log in asmisp:rsync --archive --chown=misp:misp ~/.ssh /home/misp/rsync: A utility for efficiently transferring and synchronizing files.--archive: Preserves permissions, ownership, timestamps, etc.--chown=misp:misp: Ensures the copied.sshdirectory and its contents are owned by themispuser and group.
2.5 Securing SSH (Disabling Root Login & Password Authentication)
Now that we have a sudo user with SSH key access, we can (and should!) disable direct root login via SSH and disable password-based authentication entirely. This significantly enhances server security.
Edit the SSH server configuration file using
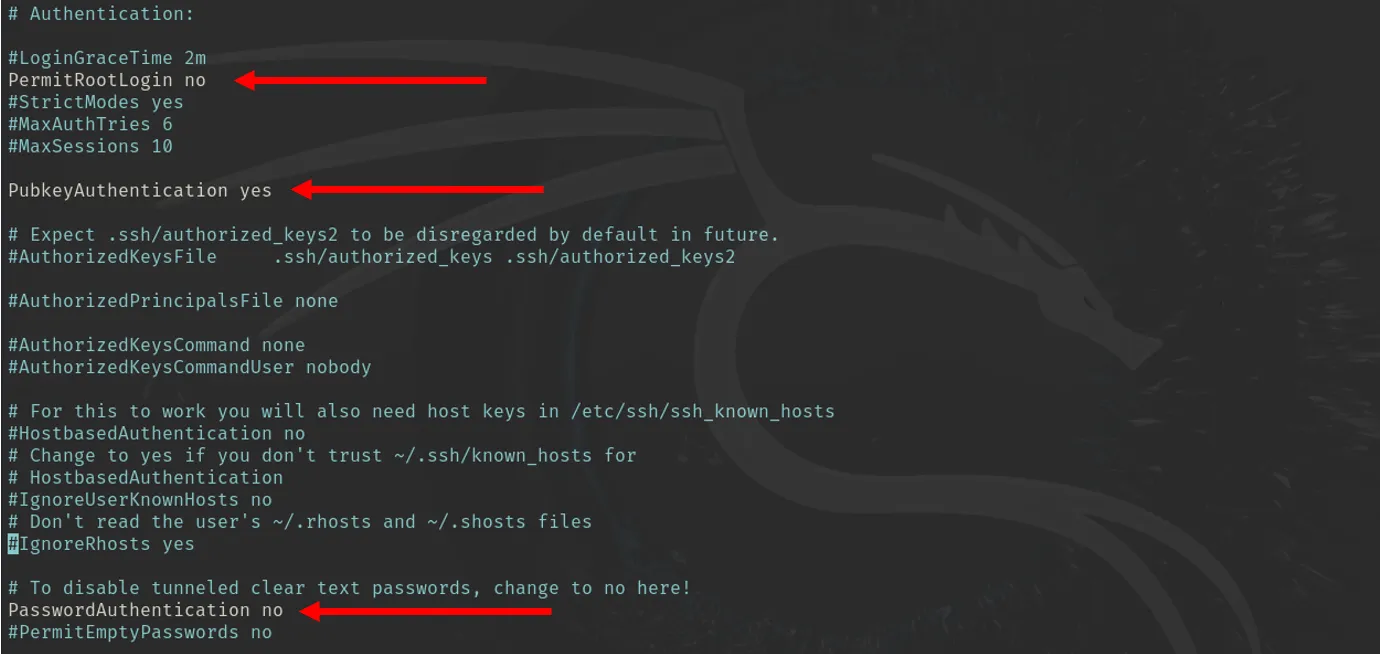
nano(a simple text editor):sudo nano /etc/ssh/sshd_configFind the following lines in the file. They might be commented out (starting with a
#). You’ll need to uncomment them (remove the#at the beginning of the line) if they are, and ensure their values are set as shown below:Locate the line for
PermitRootLogin. If it’s commented out or set to something else, change it to:PermitRootLogin noLocate the line for
PasswordAuthentication. If it’s commented out or set toyes, change it to:PasswordAuthentication noLocate the line for
PubkeyAuthentication. Ensure it is uncommented and set toyes(this is usually the default, but it’s good to verify):PubkeyAuthentication yes
- (Note: There might be other lines related to these settings, like
#PermitRootLogin prohibit-password. Ensure the active, uncommented lines reflect the settings above.)
Save the file and exit
nano:- Press
Ctrl+X. - You’ll be asked if you want to save the modified buffer. Press
Y. - You’ll be asked for the “File Name to Write”. It should default to
/etc/ssh/sshd_config. PressEnter.
- Press
Test the SSH configuration for any syntax errors before applying the changes:
sudo sshd -t(If this command returns nothing, your syntax is okay. If it outputs any errors, you’ll need to re-open
/etc/ssh/sshd_configwithsudo nanoand correct the typos or mistakes before proceeding.)If the syntax test is okay, restart the SSH service to apply your new configuration:
sudo systemctl restart sshd
2.6 Reconnecting as the Non-Root User
CRITICAL STEP: Before you log out of your current root session, open a brand new terminal window on your local machine and try to log in as your new misp user using your SSH key. This ensures your new user setup and SSH key access are working correctly before you disable root login.
In a new local terminal window:
ssh -i /path/to/your/private_key misp@YOUR_SERVER_IP- Example:
ssh -i ~/.ssh/id_ed25519 [email protected]
- Example:
If you can log in successfully as
misp, great! You can now safely close your originalrootSSH session by typingexit.If you cannot log in as
misp, DO NOT LOG OUT AS ROOT YET. Go back to therootsession, re-examine the steps in 3.4 and 3.5, especially thersynccommand and thesshd_configsettings. You might need to temporarily setPermitRootLoginyes again to fix the issue, then re-secure it.
From this point forward, you should always log in as your misp user and use sudo for commands that require root privileges.
Phase 3: Installing Core System Dependencies
With our server prepped and secured, it’s time to install the essential software components that MISP needs to function. This includes the web server, database server, PHP (the language MISP is written in) along with its necessary extensions, a caching system, and a few other utilities.
3.1 Installing Essential Packages
First, it’s always a good idea to refresh your package list, even though we did it in Phase 2:
sudo apt updateNow, run the following command to install all the required packages. This is a long command, so copy and paste it carefully:
sudo apt install -y git apache2 mariadb-server redis-server \
    php php-cli php-dev php-json php-mysql php-opcache php-readline \
    php-redis php-xml php-mbstring php-gd php-intl php-zip php-curl php-gnupg \
    libapache2-mod-php python3 python3-pip python3-dev python3-venv \
    libfuzzy-dev python3-magic ssdeep libimage-exiftool-perl curl gnupg sudo \
    python3-setuptools libxml2-dev libxslt1-dev zlib1g-dev pwgen
Let’s quickly break down what some of these key packages are for:
git: For downloading the MISP source code.apache2: Our web server that will serve the MISP interface.mariadb-server: A popular open-source database server (a fork of MySQL) where MISP will store its data.redis-server: An in-memory data store, used by MISP for caching and background job queuing.phpand variousphp-*extensions: PHP is the programming language MISP is built with, and these extensions provide necessary functionalities (like database connectivity, XML processing, image manipulation, etc.).libapache2-mod-php: Allows Apache to process PHP files.python3,python3-pip,python3-venv: For Python-based components and managing Python packages.- The rest are various libraries and utilities needed by MISP or its dependencies.
pwgen: A handy utility to generate random strings, which we’ll use for creating a strong security salt later.
This installation process might take a few minutes as it downloads and installs all the software.
3.2 Installing Composer (PHP Dependency Manager)
Composer is a tool for dependency management in PHP. MISP uses it to manage its PHP library dependencies.
- Download the Composer installer script:
curl -sS https://getcomposer.org/installer -o composer-setup.php(Optional but Recommended: Verify the installer. You can find the latest SHA384 hash on the Composer download page and compare it. For the sake of length of this guide, we’ll skip the manual hash check, but it’s good practice for production setups.)
Run the installer to install Composer globally (into
/usr/local/bin):
sudo php composer-setup.php --install-dir=/usr/local/bin --filename=composer- Remove the installer scripts:
php -r "unlink('composer-setup.php');"- Verify that the Composer is installed correctly:
composer --versionThis command should output the installed Composer version number (e.g., Composer version 2.x.x …).
Phase 4: Database Setup
With our core system dependencies in place, it’s time to prepare the database. MISP uses a MariaDB (or MySQL) database to store all its threat intelligence data, user information, and configurations.
4.1 Securing MariaDB (mysql_secure_installation)
Freshly installed MariaDB servers come with some default settings that are not ideal for security. The mysql_secure_installation script helps us address these.
- Run the security script:
sudo mysql_secure_installationYou’ll be prompted with a series of questions. Here are the recommended answers:
- “Enter current password for root (enter for none):” Since this is a new installation and we haven’t set a root password for MariaDB yet, just press Enter.
- “Switch to unix_socket authentication? [Y/n]” Type Y and press Enter. This allows you to log in as the MariaDB root user using your system’s sudo privileges without needing a separate MariaDB root password, which is generally more secure.
- “Change the root password? [Y/n]” Type N and press Enter. Since we’re using unix_socket authentication, a separate MariaDB root password isn’t strictly necessary for local root access.
- “Remove anonymous users? [Y/n]” Type Y and press Enter. Anonymous users are a security risk.
- “Disallow root login remotely? [Y/n]” Type Y and press Enter. The root database user should only be able to connect from localhost.
- “Remove test database and access to it? [Y/n]” Type Y and press Enter. The test database isn’t needed.
- “Reload privilege tables now? [Y/n]” Type Y and press Enter. This applies all the changes you just made.
You will not directly interact with this database, but it will be used my MISP in the background to store all the data related to the project.
4.2 Creating the MISP Database and User
Now, we’ll create a specific database for MISP and a dedicated database user that MISP will use to connect to it. It’s good practice not to use the root database user for applications.
Log in to the MariaDB server as the root user:
sudo mysql -u root -p
(If you followed the mysql_secure_installation steps above and enabled unix_socket authentication, it might log you in directly without asking for a password. If it does ask, and you didn’t set one, try pressing Enter. If you did set one, enter it.)
You should now see the MariaDB prompt, which looks like MariaDB [(none)]> 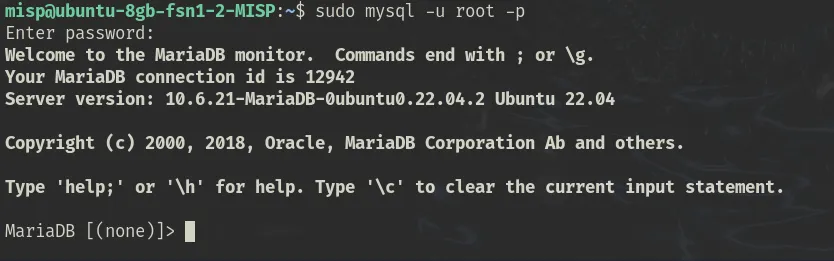
Inside the MariaDB prompt, execute the following SQL commands one by one. Remember to replace
'YOUR_STRONG_MISP_DB_PASSWORD'with the strong, unique password you decided on for the MISP database user.First, to ensure a clean state (it’s okay if these give an error if the database/user don’t already exist):
DROP DATABASE IF EXISTS misp;
DROP USER IF EXISTS 'misp'@'localhost';
Create the
mispdatabase. Usingutf8mb4is recommended for broad character support:CREATE DATABASE misp CHARACTER SET utf8mb4 COLLATE utf8mb4_unicode_ci;Create the database user named
misp. This user will only be allowed to connect fromlocalhost(the server itself) for better security. Replace'YOUR_STRONG_MISP_DB_PASSWORD'with your chosen password:CREATE USER 'misp'@'localhost' IDENTIFIED BY 'YOUR_STRONG_MISP_DB_PASSWORD';Grant all necessary permissions on the
mispdatabase to the newmispuser:GRANT ALL PRIVILEGES ON misp.* TO 'misp'@'localhost';Apply these privilege changes immediately:
FLUSH PRIVILEGES;Finally, exit the MariaDB prompt:
EXIT;
You’ve now successfully secured MariaDB and created the dedicated database and user for MISP. Keep the YOUR_STRONG_MISP_DB_PASSWORD you used safe and handy, as you’ll need it when configuring MISP in a later phase.
Phase 5: Installing the MISP Application and Core MISP Configuration
NOTE: This guide assumes a user name of ‘misp’ with sudo working but can be overwritten by setting the environment variable
Now it’s the time! To install MISP all you need to do is the following on a clean supported distribution.
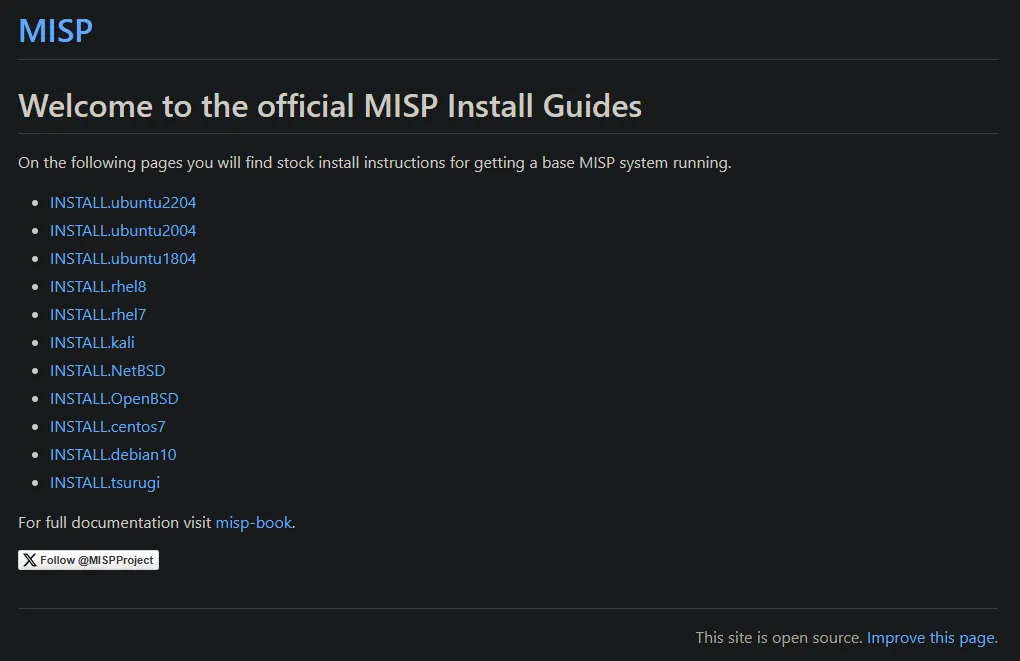
Go to the Official website of MISP https://misp.github.io/MISP/ and check for the OS version that you have on your server. For this tutorial we will select Ubuntu 22.04.
Now run the following commands (similar on the page of your selected OS):
# Please check the installer options first to make the best choice for your install
wget --no-cache -O /tmp/INSTALL.sh https://raw.githubusercontent.com/MISP/MISP/2.4/INSTALL/INSTALL.sh
bash /tmp/INSTALL.sh

# This will install MISP Core
wget --no-cache -O /tmp/INSTALL.sh https://raw.githubusercontent.com/MISP/MISP/2.4/INSTALL/INSTALL.sh
bash /tmp/INSTALL.sh -c
Run each command one after the another and let the install script do its job. It’s a long process and may take up to or more than ~30 mins depending on the CPU and network speed. The folks at MISP made it super easy to have a personal MISP server up and running, you just gotta give it some time to install everything.
And Voila!! Now you have officially MISP running on your server. This MISP server is now accessible on the localhost IP (127.0.0.1); however you cannot access it through the internet from the comfort of your mobile from anywhere just yet. In the next steps we will setup an Apache server for doing just that!
Phase 6: Configuring the Web Server (Apache)
Now that MISP is installed and its basic configuration is done, we need to tell our Apache web server how to find and serve the MISP application. This involves enabling a couple of Apache modules and creating a specific configuration file (a “Virtual Host”) for MISP.
(Remember to run these commands as your non-root sudo user, e.g., misp)
6.1 Enabling Required Apache Modules
MISP relies on a couple of Apache modules for its functionality, particularly for URL rewriting and managing headers.
Enable the rewrite module (for clean URLs) and the headers module:
sudo a2enmod rewrite
sudo a2enmod headers
You’ll likely see a message suggesting you restart Apache for these changes to take effect. We’ll do that after configuring the site.
6.2 Creating the Apache Site Configuration (misp.conf for HTTP)
We need to create a Virtual Host configuration file that tells Apache where MISP’s web-accessible files are located and how to handle requests for it.
Create a new configuration file for MISP within Apache’s
sites-availabledirectory usingnano:sudo nano /etc/apache2/sites-available/misp.confPaste the following configuration into the file. This sets up MISP to be accessible via HTTP (port 80) for now. We’ll add HTTPS later.
<VirtualHost *:80>
	# ServerAdmin webmaster@localhost  # Optional: You can set your email here
	# ServerName your.misp.domain.com # Optional for now, will be important for HTTPS

	DocumentRoot /var/www/MISP/app/webroot

	<Directory /var/www/MISP/app/webroot>
		Options -Indexes +FollowSymLinks
		AllowOverride All
		Require all granted
	</Directory>

	ErrorLog ${APACHE_LOG_DIR}/misp.error.log
	CustomLog ${APACHE_LOG_DIR}/misp.access.log combined
</VirtualHost>
DocumentRoot /var/www/MISP/app/webroot: This is the crucial line telling Apache where the main web-accessible files for MISP are.<Directory ...>block: Sets permissions and options for that directory, notablyAllowOverride Allwhich allows MISP’s.htaccessfiles (if any) to function correctly.ErrorLogandCustomLog: Define where Apache will store error and access logs specifically for this MISP site.
- Save the file and exit
nano(Ctrl+X, then Y, then Enter).
6.3 Enabling the MISP Site and Disabling the Default
Apache comes with a default placeholder site enabled. We need to disable that and enable our new MISP site configuration.
Disable the default Apache site:
sudo a2dissite 000-default.confEnable your new MISP site configuration:
sudo a2ensite misp.confYou’ll see messages indicating the site is enabled and that you need to reload or restart Apache.
6.4 Testing Apache Configuration and Restarting
Before restarting Apache, it’s always a good idea to test your configuration for any syntax errors.
Test the Apache configuration:
sudo apache2ctl configtestYou should see
Syntax OK.If you see errors, double-check yourmisp.conffile for typos. The commonAH00558: apache2: Could not reliably determine the server's fully qualified domain name...warning can be safely ignored at this stage. You should expect similar output as shown below.
If the syntax is OK, restart Apache to apply all the changes (module enabling and new site configuration):
sudo systemctl restart apache2
That’s it for configuring Apache for basic HTTP access! Your MISP instance should now technically be served by Apache, although we still have a few more MISP-specific steps before it’s fully operational and accessible via your browser. Next up, the final MISP setup steps and our first login attempt!
Phase 7: Finalizing MISP Setup & First Login
With Apache configured to serve MISP, we have a few last crucial steps to prepare MISP itself before we can access the web interface. This includes setting up GPG for data integrity and importing the initial database structure. (Continue running commands as your non-root sudo user, e.g., misp)
7.1 Creating GPG Directory & Setting Permissions
MISP uses GnuPG (GPG) for various functions, including signing notifications. The web server user (www-data) needs its own GPG directory.
Create the .gnupg directory within www-data’s typical home directory (/var/www):
sudo mkdir /var/www/.gnupgSet the correct ownership so www-data can use it:
sudo chown www-data:www-data /var/www/.gnupgSet strict permissions, as GPG requires this directory to be private:
sudo chmod 700 /var/www/.gnupg
7.2 Generating the GPG Key for www-data
Now, we’ll generate a GPG key pair for the www-data user.
- Run the key generation command as the
www-datauser:sudo -u www-data gpg --gen-key - You will be prompted with several questions. Follow these recommendations:
- “Please select what kind of key you want:” Press Enter to accept the default (usually
(1) RSA and RSA). - “What keysize do you want? (3072)” Press Enter for the default (3072), or type
4096for a stronger key, then press Enter. - “Key is valid for? (0)” Press Enter for
0(key does not expire). You can choose a different duration if you prefer (e.g.,1yfor one year). - “
Is this correct? (y/N)” Typeyand press Enter. - “Real name:” Type
MISP Serviceand press Enter. - “Email address:” Type
misp@localhost(or another appropriate local email, like[email protected]if you plan to set up local mail delivery) and press Enter. - “Comment:” You can leave this blank and press Enter.
- “Change (N)ame, (C)omment, (E)mail or (O)kay/(Q)uit?” Type
O(for Okay) and press Enter. - “Enter passphrase:” CRITICAL! For unattended use by MISP, you must leave the passphrase empty. Just press Enter.
- “Repeat passphrase:” Press Enter again.
- GPG will now generate the key. It might say it needs to gather random data. If it seems to stall, try moving your mouse, typing random characters on the keyboard (they won’t show), or performing some disk activity in another terminal to help generate entropy. This can take a few moments. With this now you have a GPG key ready for use.
7.3 Updating config.php with GPG Details
Once the key is generated, we need to tell MISP which key to use.
List the GPG keys for the
www-datauser to find the Key ID/Fingerprint. Run:sudo -u www-data gpg --list-keysYou will see output similar to this (your key ID and dates will be different):
/var/www/.gnupg/pubring.kbx
-----------------------------
pub   rsa4096 2025-04-20 [SC] [expires: 2027-04-20]
      XXXXXXXXXXXXXXXXXXXXXXXXXXXXXXXXXXXXXXXX  <--- This is the Fingerprint
uid           [ultimate] MISP Service <misp@localhost>
sub   rsa4096 2025-04-20 [E] [expires: 2027-04-20]
Carefully copy the long hexadecimal string (the fingerprint, highlighted above as
XXXXXXXXXXXXXXXXXXXXXXXXXXXXXXXXXXXXXXXX). An example of this output can be seen below (Used for demonstration - this key is not used anywhere)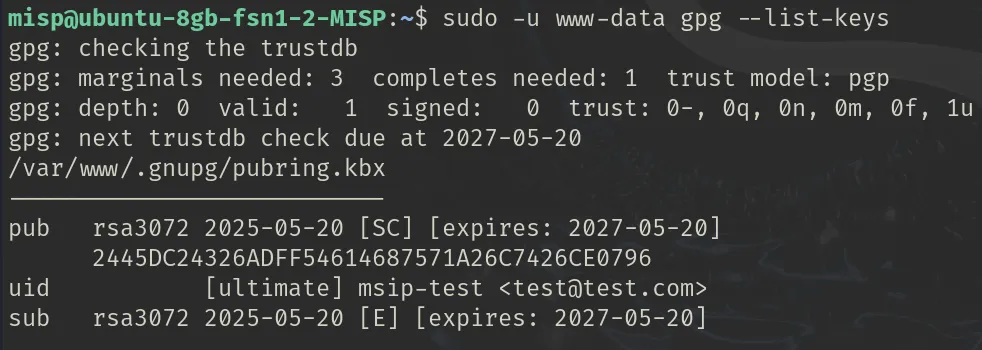
Edit the MISP
config.phpfile:sudo nano /var/www/MISP/app/Config/config.phpLocate the
'GnuPG'configuration array within the file. It might look something like this by default:'GnuPG' => [ 'email' => '', 'homedir' => '', 'password' => null, 'bodyonlyencrypted' => false, 'sign' => true, 'fingerprint' => '', 'binary' => '/usr/bin/gpg', ],Update this section with your generated key’s details. Replace
YOUR_COPIED_FINGERPRINT_HEREwith the actual fingerprint you copied in the previous step:'GnuPG' => [ 'email' => 'misp@localhost', // Or the email you used when generating the GPG key 'homedir' => '/var/www/.gnupg', 'password' => null, // Crucial: ensure this is null if you set no passphrase 'bodyonlyencrypted' => false, 'sign' => true, 'fingerprint' => 'YOUR_COPIED_FINGERPRINT_HERE', // Paste your key's fingerprint 'binary' => '/usr/bin/gpg', // This path should be correct for Ubuntu ],Save the file and exit
nano(PressCtrl+X, thenYto confirm, thenEnter).
7.4 Creating the MISP Logs Directory
MISP needs a directory to write its application-specific logs.
Create the logs directory inside /var/www/MISP/app/tmp/:
sudo mkdir /var/www/MISP/app/tmp/logsSet the correct ownership and permissions:
sudo chown www-data:www-data /var/www/MISP/app/tmp/logs
sudo chmod 750 /var/www/MISP/app/tmp/logs`
7.5 Importing the Database Schema
The MISP database is currently empty. We need to import the basic table structure.
Run the following command. It will prompt you for the password of the
mispdatabase user (theYOUR_STRONG_MISP_DB_PASSWORDyou set earlier).sudo mysql -u misp -p misp < /var/www/MISP/INSTALL/MYSQL.sqlEnter the password when prompted. This command should execute without any output if successful.
Let’s restart Apache one more time to ensure all PHP and Apache configurations are fully loaded.
sudo systemctl restart apache2
7.6 Accessing the Web UI (The Moment of Truth!)
Now, it’s time to try accessing your MISP instance through your web browser.
Open your preferred web browser.
In the address bar, type
http://YOUR_SERVER_IP(replacingYOUR_SERVER_IPwith your server’s actual IP address, e.g.,http://10.10.10.10). Press Enter.Observe what loads in the browser:
Success Scenario: MISP Login Page If you see the MISP login page, congratulations! This means the core installation and web server configuration are working.
- The default login credentials are:
- Email:
[email protected] - Password:
admin
- Email:
- Enter these credentials and click “Login”.
- You will be immediately prompted to change the default password. Choose a new, strong, and unique password for this main administrator account and save it securely.
- The default login credentials are:
Troubleshooting Scenario: Error Page or Blank Page If you encounter an error page (it might be a CakePHP error page if debug mode is still on, or a generic browser error) or a completely blank white page, don’t worry. This indicates there’s still an issue to resolve. Proceed to the troubleshooting steps (which usually involve checking the Apache and MISP error logs. Again for complexity reasons I am skipping this step, however it’s not extremely challenging to resolve the issues if any is to appear).
If everything till this point went smoothly - Congratulations!!! Now you have your own MISP instance running on the server!!!
Phase 8: Securing Your MISP Instance with HTTPS (Let’s Encrypt)
Accessing MISP over HTTP is fine for initial setup, but for any real use, we absolutely need to secure the connection with HTTPS. We’ll use Let’s Encrypt, a free, automated, and open Certificate Authority, along with the Certbot tool to obtain and install an SSL/TLS certificate
8.1 Prerequisites for HTTPS
Before you start, ensure you have the following:
A Registered Domain Name: You need a domain name (e.g.,
yourdomain.com) and you’ll likely want to use a subdomain for MISP (e.g.,misp.yourdomain.com).DNS ‘A’ Record: The DNS ‘A’ record for your chosen fully qualified domain name (FQDN) (e.g.,
misp.yourdomain.com) must point to your server’s public IP address (10.10.10.10).- If your server has an IPv6 address, also create an ‘AAAA’ record pointing to it.
DNS Propagation: If you just created or updated these DNS records, allow some time for them to propagate across the internet. This can take anywhere from a few minutes to several hours, though it’s often quick.
Firewall Port 443 Open: Your Hetzner Cloud Firewall (and any OS-level firewall like
ufwif you configured one) must allow incoming TCP traffic on port443. You should have added this rule when initially setting up the server firewall.
8.2 Setting up your DNS record (Example using Cloudflare)
You’ll configure your DNS record with your domain registrar or DNS provider. Here’s a general example using Cloudflare, as it’s a popular choice:
Log in to your Cloudflare dashboard.
Select your domain (e.g.,
yourdomain.com).Go to the “DNS” section.
Click ”+ Add record”:
- Type:
A - Name: Enter your desired subdomain (e.g.,
misp). Cloudflare will automatically append.yourdomain.com. - IPv4 address:
YOUR_HETZNER_IP_ADDRESS - Proxy status: Crucially, for the initial Certbot validation, click the orange cloud icon to make it grey (“DNS only”). Certbot needs to connect directly to your server. You can re-enable the proxy (orange cloud) after the certificate is successfully installed if you wish.
- TTL: “Auto” is usually fine.
- Click “Save”.
- Type:
(Optional, but recommended if your server has IPv6) Add an
AAAArecord similarly, using your server’s IPv6 address. Ensure its proxy status is also “DNS only”.
Wait for DNS propagation. You can use online tools like dnschecker.org to verify that misp.yourdomain.com resolves to YOUR_HETZNER_IP_ADDRESS from various locations.
8.3 Installing Certbot and the Apache Plugin
Certbot is the client software that automates fetching and deploying Let’s Encrypt certificates.
Ensure your package list is up to date:
sudo apt updateInstall Certbot and its Apache plugin:
sudo apt install certbot python3-certbot-apache -y
8.4 Running Certbot to Obtain and Install the Certificate
Now, we’ll run Certbot. It will communicate with Let’s Encrypt, verify your domain, and configure Apache.
Execute the Certbot command, replacing misp.yourdomain.com with your actual FQDN:
sudo certbot --apache -d misp.yourdomain.comCertbot will guide you through a few prompts:
- Enter email address: Provide a valid email for renewal reminders and security notices.
- Terms of Service: Read and agree (usually type A and Enter).
- Share email with EFF: Your choice (Y/N) - I’d say yes (They are nice folks).
- Redirect HTTP to HTTPS: When asked, it’s highly recommended to choose option 2 (Redirect). This ensures all traffic to your MISP instance is automatically forced over HTTPS.
If all goes well, Certbot will confirm successful certificate issuance and deployment. It will also tell you where your certificate files are stored (usually in /etc/letsencrypt/live/misp.yourdomain.com/).
8.5 Troubleshooting Certbot Redirect Issues (If Necessary)
Sometimes, Certbot might successfully obtain the certificate but struggle to automatically configure the HTTP-to-HTTPS redirect, especially if your Apache configuration is complex or non-standard. If Certbot reports an issue with the redirect:
Manually Edit Your HTTP Virtual Host: Open your HTTP configuration file (the one for port 80):
sudo nano /etc/apache2/sites-available/misp.confEnsure it has the correct
ServerNameand add theRedirectdirective:<VirtualHost *:80> ServerName misp.yourdomain.com # Make sure this matches your domain # Redirect all HTTP traffic to HTTPS Redirect permanent / https://misp.yourdomain.com/ DocumentRoot /var/www/MISP/app/webroot # ... rest of your HTTP config ... </VirtualHost>Save the file, test the Apache config (
sudo apache2ctl configtest), and restart Apache (sudo systemctl restart apache2).
8.6 Updating MISP baseurl Configuration
MISP needs to know its full HTTPS URL to generate links correctly.
Edit the MISP config file:
sudo nano /var/www/MISP/app/Config/config.phpFind the
'MISP'array and update the'baseurl'setting:'MISP' => array( 'baseurl' => 'https://misp.yourdomain.com', // Use https and your full domain // ... other settings ... ),Save and close the file.
8.7 Verifying HTTPS and Auto-Renewal
Restart Apache one last time to ensure all changes are loaded:
sudo systemctl restart apache2Test in your browser:
- Navigate to
https://misp.yourdomain.com. You should see the MISP login page, and your browser should show a padlock icon indicating a secure connection. - Try navigating to
http://misp.yourdomain.com. It should automatically redirect to thehttps://version.
- Navigate to
Check Certbot’s auto-renewal timer: Certbot sets up a systemd timer (or cron job) to automatically renew your certificate before it expires.
sudo systemctl status certbot.timer(Should show active and loaded)
You can also perform a dry run of the renewal process:
sudo certbot renew --dry-run(This should complete successfully without actually renewing if the cert isn’t due yet)
Finally now you have your own HTTPS web domain with MISP server running!! It should look similar to this: 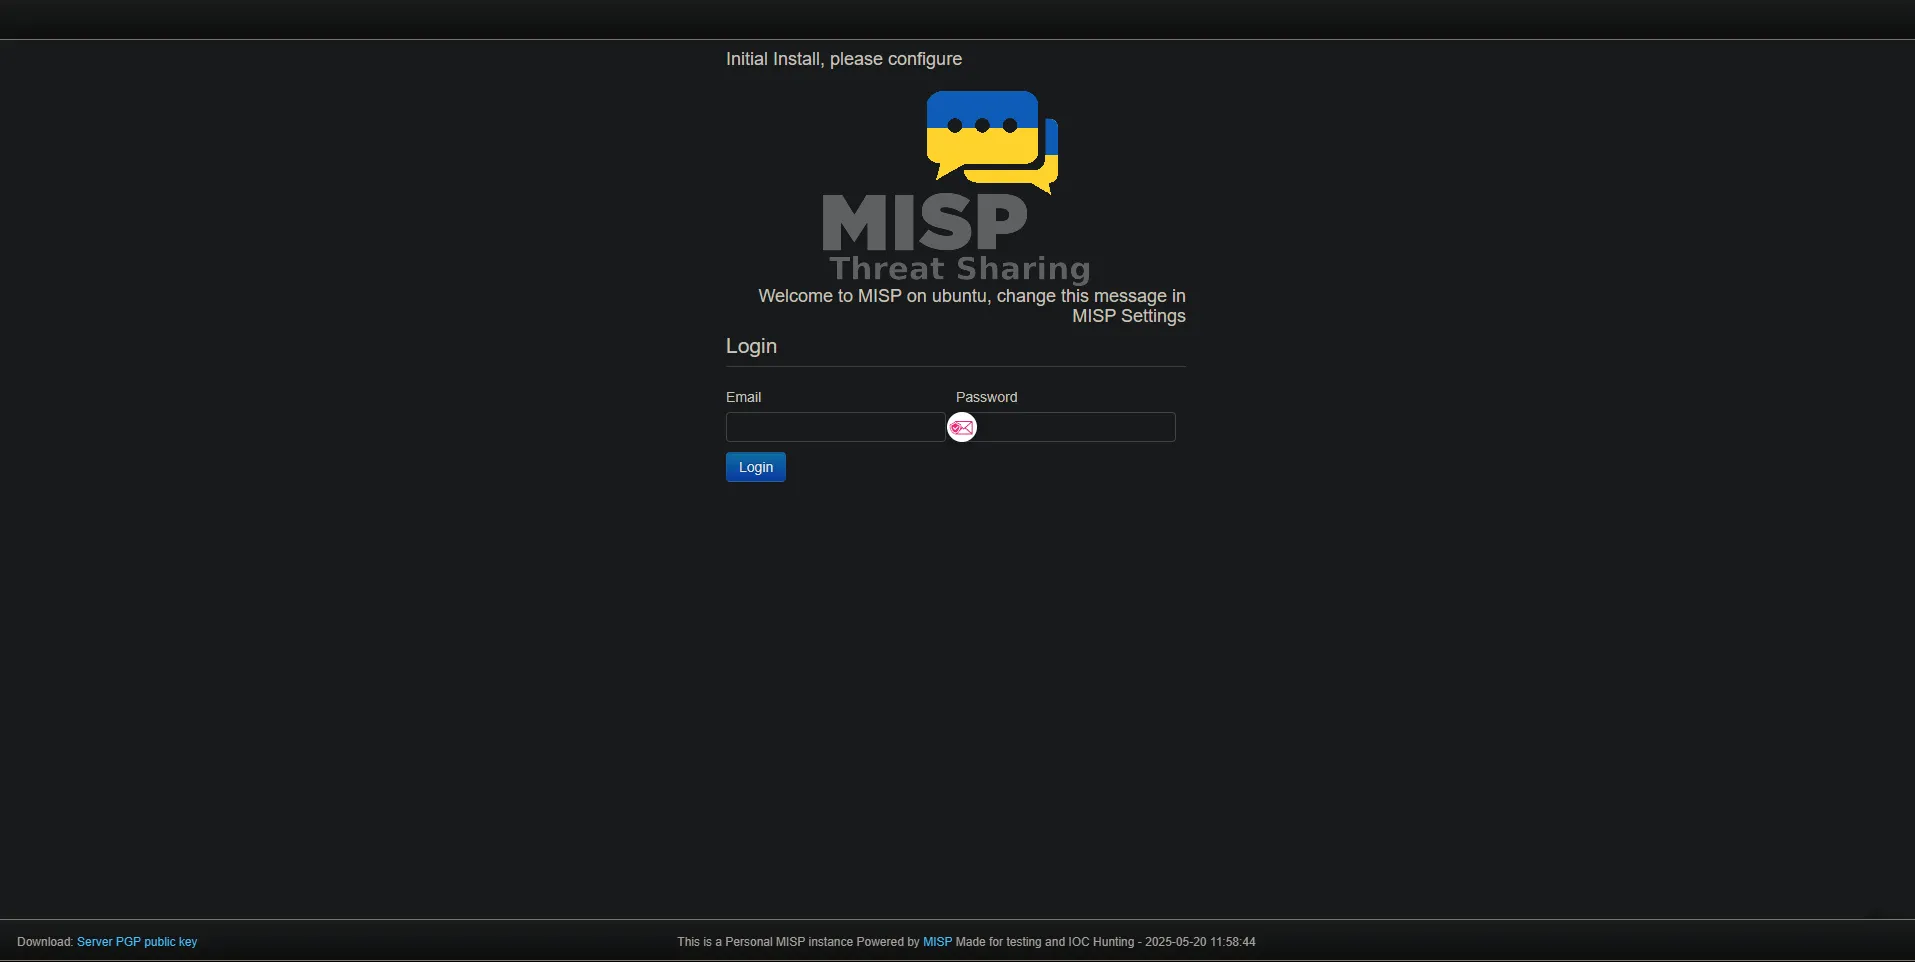
This is a vital step for protecting your data and user credentials. Next, we’ll look at essential post-installation tasks to make MISP fully operational.
Phase 9: Enabling and Configuring Feeds
With your MISP instance secure and accessible, it’s time to start populating it with threat intelligence! One of the primary ways to do this is by enabling and syncing with external MISP feeds.
9.1 What are MISP Feeds?
MISP feeds are continuous streams of threat intelligence data (events and attributes) provided by various organizations and communities. By subscribing your MISP instance to these feeds, you can automatically ingest valuable IOCs, threat actor information, malware details, and more. This keeps your local MISP instance updated with the latest publicly available or community-shared intelligence.
Feeds can come in different formats (MISP native format, CSV, freetext) and cover various types of threats.
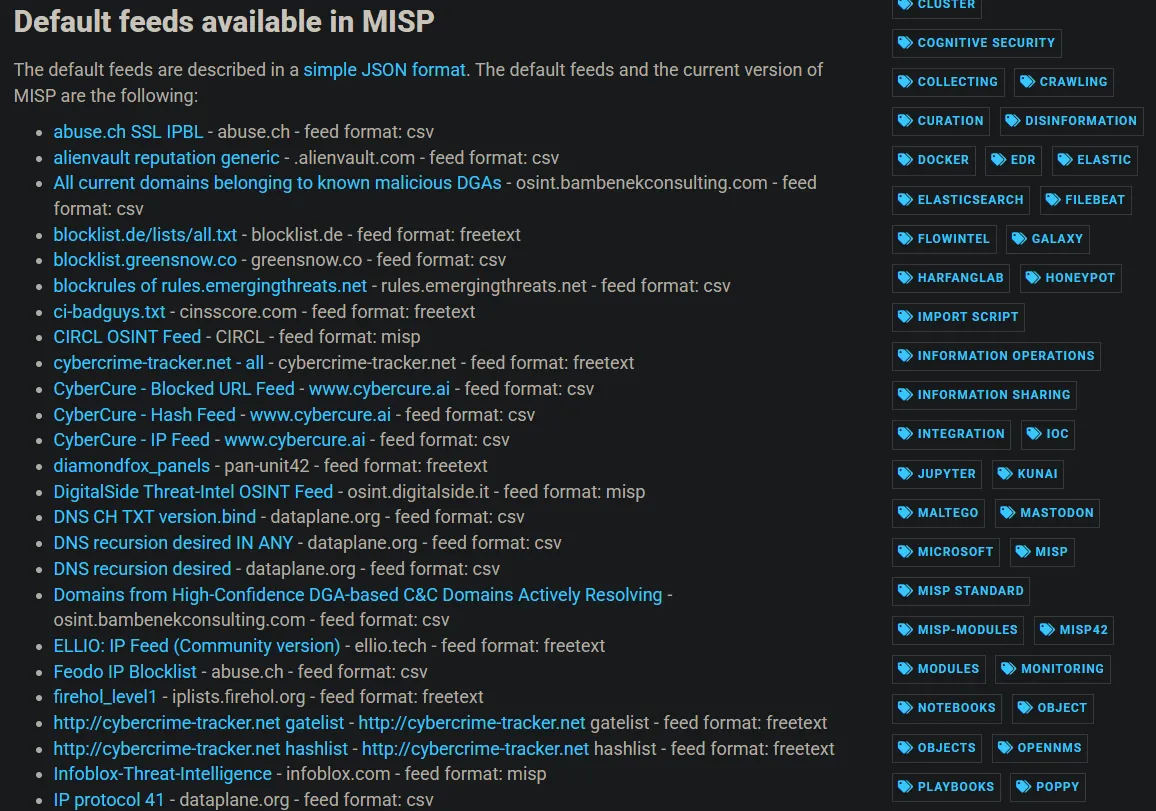
9.2 Finding and Adding Common OSINT Feeds
Many organizations provide excellent Open Source Intelligence (OSINT) feeds that you can add to your MISP instance for free. Here are a few popular ones to get you started:
- CIRCL OSINT Feed: Provided by the Computer Incident Response Center Luxembourg (CIRCL), this is a comprehensive feed of various IOCs.
- URL:
https://www.circl.lu/doc/misp/feed-osint
- URL:
- ThreatFox (by abuse.ch): Focuses on malware IOCs.
- URL:
https://threatfox.abuse.ch/export/misp/
- URL:
- Botvrij.eu Data: Provides data related to botnets and malicious infrastructure.
- URL:
https://www.botvrij.eu/data/feed-osint/
- URL:
- DigitalSide Threat-Intel OSINT Feed: Another good source of general threat intelligence.
- URL:
https://osint.digitalside.it/Threat-Intel/digitalside-misp-feed/
- URL:
- Abuse.ch SSL IPBL (SSL Blacklist): A list of IP addresses involved in SSL certificate abuse.
- URL:
https://sslbl.abuse.ch/blacklist/sslblacklist.csv(Note: This is a CSV feed)
- URL:
- Dataplane.org DNS Recursion Desired: A list of IPs that are likely misconfigured open DNS resolvers.
- URL:
https://dataplane.org/dnsrd.txt(Note: This is a freetext feed)
- URL:
All feeds available in MISP are listed here - https://www.misp-project.org/feeds/
How to Add a Feed in MISP:
- Log in to your MISP instance as an administrator (e.g., your
[email protected]account or theOrg Adminyou created). - Navigate to “Sync Actions” in the left-hand menu, then click on “List Feeds”.
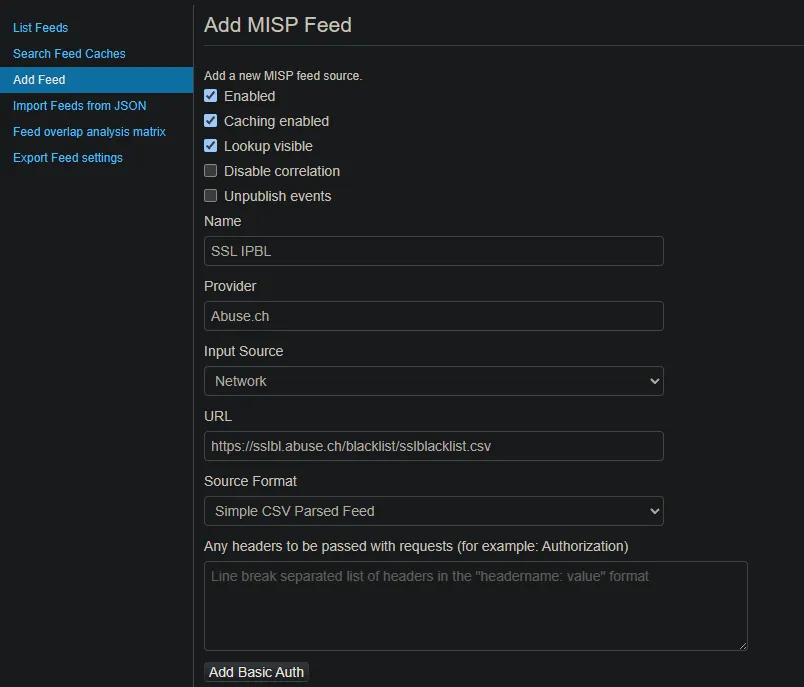
- Click the ”+ Add Feed” button (usually top right).
- Fill in the details for the feed:
- Enabled: Check this box to enable the feed.
- Caching enabled: Check this box. MISP will download the feed content and cache it locally.
- Name: Give the feed a descriptive name (e.g., “CIRCL OSINT Feed”).
- Provider: Name of the organization providing the feed (e.g., “CIRCL”, “Abuse.ch”).
- Input Source: Select “Network”.
- URL: Paste the URL of the feed (from the list above or other sources).
- Format:
- For feeds like CIRCL, ThreatFox, Botvrij.eu, DigitalSide, select “MISP Feed”.
- For the Abuse.ch SSL IPBL, select “CSV”.
- For the Dataplane.org DNS feed, select “Freetext”.
- Shown in the example of adding one such feed.
- Default Tag: (Optional) You can add a default tag to all events coming from this feed.
- Distribution: Choose how events from this feed should be distributed by default if you re-publish them (e.g., “Your organization only,” “This community only”). “All communities” is often a good default for public OSINT feeds if you intend to share broadly.
- Filter rules: (Advanced) You can set rules to include/exclude specific types of data. Leave blank for now.
- Headers: Usually not needed for public feeds.
- Target Event:
- For most MISP format feeds, leave this as “New event”.
- For CSV or Freetext feeds that are just lists of indicators (like the SSL IPBL or Dataplane DNS), you might want to select “New fixed event”. This puts all indicators from each fetch into a single, periodically updated event, rather than creating a new event for each indicator. Give the fixed event a name (e.g., “Abuse.ch SSL IPBL Daily”).
- Click “Submit”.
- Repeat for each feed you want to add.
9.3 Enabling, Caching, and Fetching Feeds
Once feeds are added, you need to tell MISP to download their content (cache) and then process that content into events (fetch).
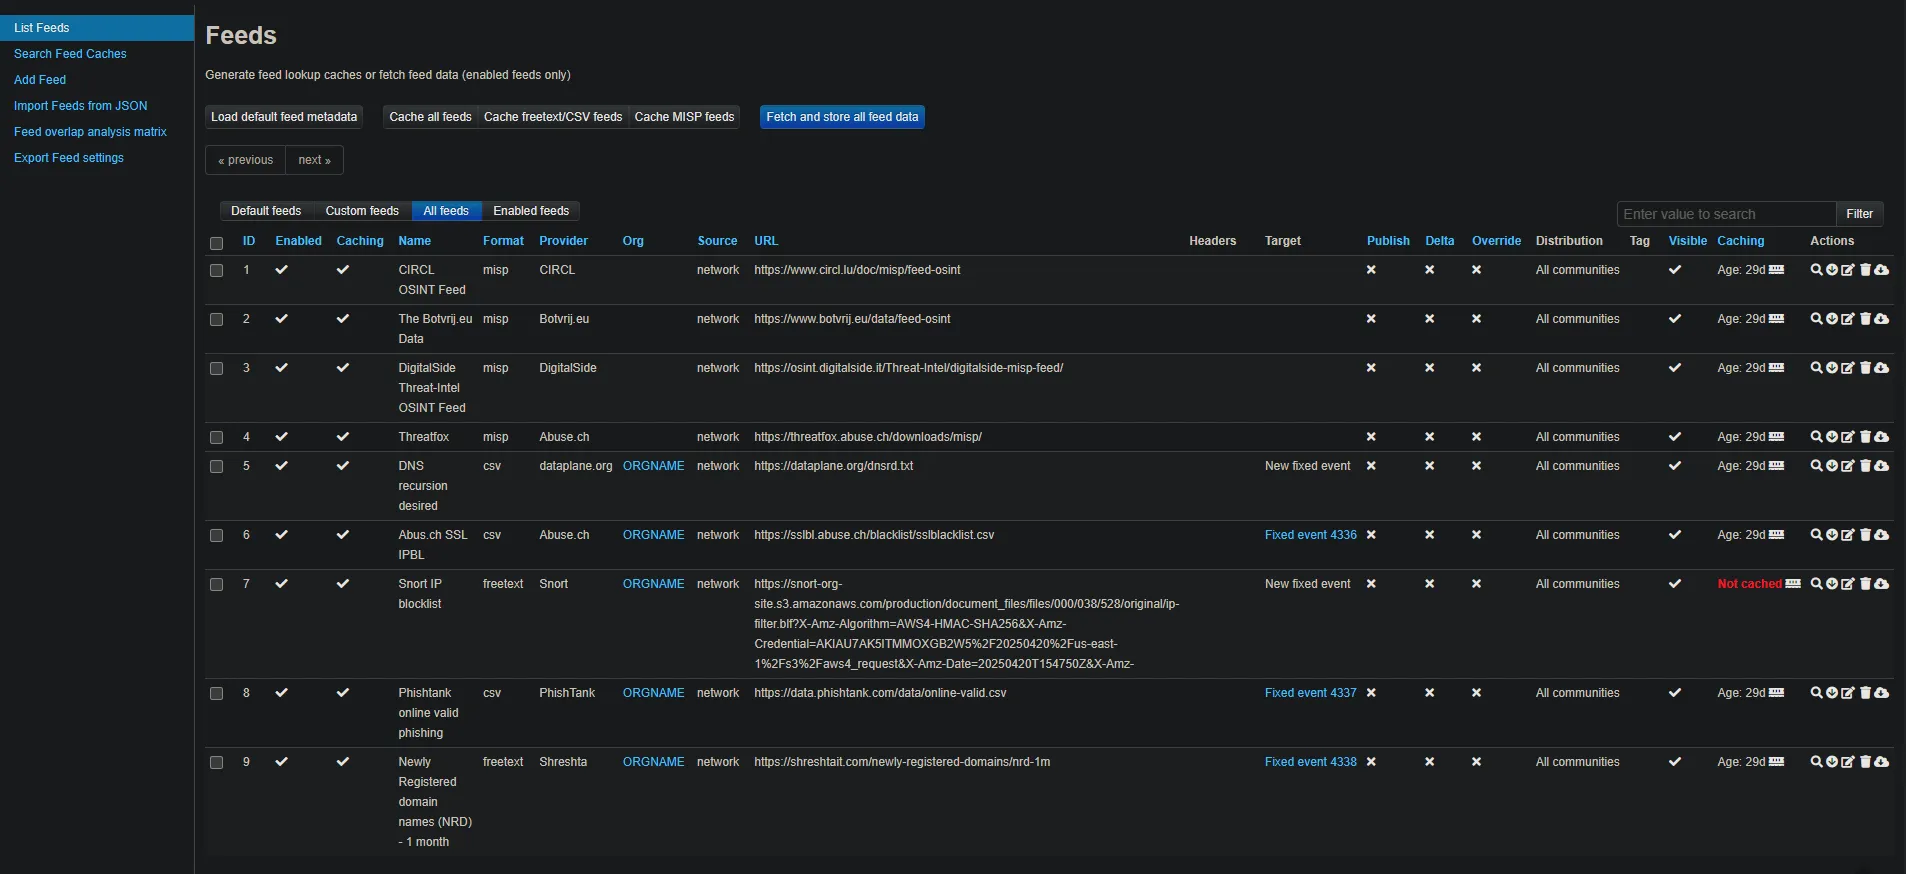
- Go to “Sync Actions” -> “List Feeds”.
- For each feed you want to activate:
- Ensure the “Enabled” and “Caching enabled” checkboxes are ticked.
- Click the “Download all” icon (looks like a cloud with a down arrow) in the “Actions” column for that feed. This will download the feed’s manifest and data.
- After it’s downloaded (you might need to refresh the page or wait a bit), click the “Fetch and store all feed data” icon (looks like a play button or a circular arrow) for that feed. This will process the cached data and create events in MISP.
- Alternatively, you can use the buttons at the top of the List Feeds page: “Fetch all feed data” and “Cache all feed data” to perform these actions for all enabled and cacheable feeds.
9.4 The Initial Heavy Load and Expected Duration
Be Prepared: The very first time you fetch data from these feeds, especially comprehensive ones like CIRCL OSINT, it can be a very resource-intensive process for your server.
- Why? MISP is downloading potentially years of historical data, parsing it, inserting millions of attributes into the database, and attempting to correlate them.
- CPU Usage: Expect your server’s CPU usage to go to 100% (or even higher if you have multiple cores) and stay there for a prolonged period.
- Duration: This initial sync can take many hours, potentially even 12-48 hours or longer, depending on the size of the feeds, the number of feeds enabled simultaneously, and your server’s resources (CPU, RAM, disk I/O).
- The 5+ hours you observed earlier is perfectly normal for an initial sync.
- What to do:
- Be patient. Let the process run. Interrupting it can lead to incomplete data.
- Monitor server resources: Keep an eye on disk space (
df -h) and memory (htoporfree -m). High CPU is expected. - Check worker logs: If you suspect it’s stuck (no new events appearing for a very long time), check the MISP worker logs for errors:
/var/www/MISP/app/tmp/logs/resque-worker-error.log/var/www/MISP/app/tmp/logs/error.log
- Subsequent Syncs: After the initial full import, subsequent feed fetches (handled by the cron jobs you’ll set up) will only pull new data and will be much, much faster, typically taking only minutes.
Enabling feeds is what truly brings your MISP instance to life with actionable intelligence. Just be prepared for that initial data surge!
10. Conclusion: Your MISP Instance is Ready!
Congratulations!!!
If you’ve followed along this far, you’ve successfully navigated the journey from a bare cloud server to deploying a secure, functional, and feed-enabled MISP instance on Hetzner Cloud.
Where to Go From Here? (Further Exploration)
Your MISP journey doesn’t end here! This platform is incredibly rich in features. Here are some areas you might want to explore next:
- Deep Dive into Feeds: Explore more specialized feeds relevant to your interests or industry.
- MISP Modules: If you skipped them earlier, now might be a good time to install and explore MISP modules for data import/export and enrichment.
- User and Organization Management: If you’re working with a team, learn how to create users, roles, and organizations within MISP.
- Sharing Groups: Understand how to create and manage sharing groups for controlled distribution of intelligence.
- API Integration: Explore the powerful MISP API to automate data input/output with your other security tools or scripts (PyMISP is your friend here!).
- Event Creation and Analysis: Start creating your own events, adding attributes, and leveraging MISP’s correlation engine.
- Taxonomies, Galaxies, and Objects: Delve into MISP’s structured data models to add more context and richness to your threat intelligence.
- Workflows: Automate common tasks within MISP using its workflow engine.
Official MISP Documentation & Community:
The official MISP documentation is an invaluable resource. Don’t hesitate to consult it:
- MISP Project Main Site: https://www.misp-project.org/
- MISP GitHub Repository (Source Code & Issue Tracker): https://github.com/MISP/MISP
- MISP Installation Guides: https://misp.github.io/MISP/ (You’ll find guides for various OS here)
- MISP Training Materials: Often linked from the main project site.
- MISP Gitter Channel/Mailing Lists: For community support and discussions.
Thank you for following this guide. We hope you find your new MISP instance to be a powerful asset in your cybersecurity endeavors. Happy threat hunting!
If you have any problems, issues or suggestions in general - I’ll be happy to help! Just drop me a mail at: [email protected] or Hit me up on Twitter: https://twitter.com/XerxesViper